Datasheet
Year, pagecount:2010, 11 page(s)
Language:English
Downloads:17
Uploaded:March 05, 2013
Size:199 KB
Institution:
-
Comments:
Attachment:-
Download in PDF:Please log in!
Comments
No comments yet. You can be the first!Most popular documents in this category


Content extract
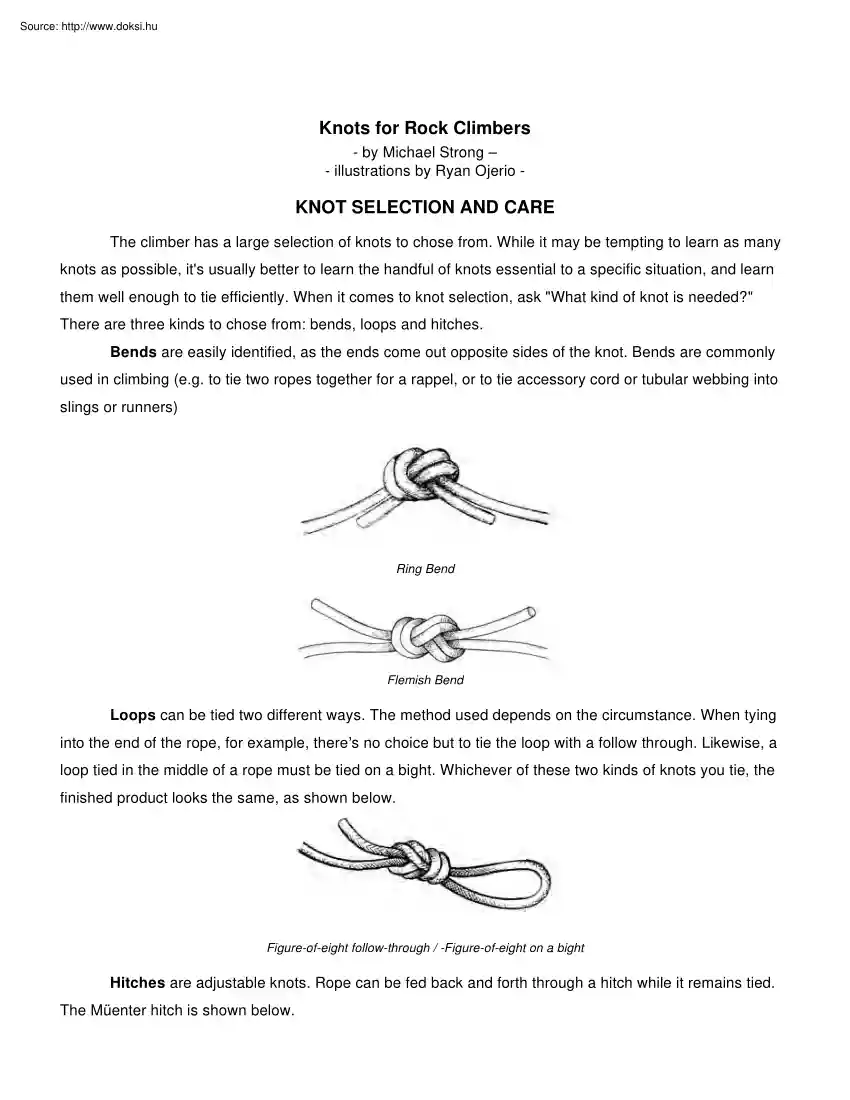
Knots for Rock Climbers - by Michael Strong – - illustrations by Ryan Ojerio - KNOT SELECTION AND CARE The climber has a large selection of knots to chose from. While it may be tempting to learn as many knots as possible, its usually better to learn the handful of knots essential to a specific situation, and learn them well enough to tie efficiently. When it comes to knot selection, ask "What kind of knot is needed?" There are three kinds to chose from: bends, loops and hitches. Bends are easily identified, as the ends come out opposite sides of the knot. Bends are commonly used in climbing (e.g to tie two ropes together for a rappel, or to tie accessory cord or tubular webbing into slings or runners) Ring Bend Flemish Bend Loops can be tied two different ways. The method used depends on the circumstance When tying into the end of the rope, for example, thereʼs no choice but to tie the loop with a follow through. Likewise, a loop tied in the middle of a rope must be
tied on a bight. Whichever of these two kinds of knots you tie, the finished product looks the same, as shown below. Figure-of-eight follow-through / -Figure-of-eight on a bight Hitches are adjustable knots. Rope can be fed back and forth through a hitch while it remains tied The Müenter hitch is shown below. Knots for Climbers 2 Müenter hitch PERFORMANCE QUALITIES Once you know what kind of knot is needed, selection can be narrowed to one or two knots that will do the job. The choice of one knot over another is best based on a blend of the following performance qualities. Strength is usually the first quality that comes to mind when deciding on which knot to use. While it is important, strength should not be the sole determinant for selecting a knot. Knots used by climbers rarely break, largely because the materials used in the construction of ropes, webbing and accessory cord are more than strong enough to meet the demands normally placed upon them. Knot security is
critical. The ability of a knot to stay tied is probably more important than knot strength. Does this mean that the most secure knot is the most appropriate one? Not at all If this were the case, more climbers would use the overhand follow through as a tie-in knot. Itʼs certainly strong enough, and itʼs easier to tie than the figure-of-eight follow through. The overhand knot, however, is extremely difficult to untie once firmly loaded. Ease of tying is also important. Thereʼs no point in choosing a complicated knot when a less complex one will work just as well. Ease of untying after loading is especially important Ease of visual inspection is a performance quality that should not be overlooked. Itʼs important to be able to glance at the tie-in knot of your climbing partner, or the knots of an anchor system and quickly recognize whether these knots are tied correctly. One way to evaluate whether the right kind of knot has been selected for the job is to examine the knot when its
loaded. Look to see if the knot is stressed along its long axis If it isnʼt (eg the stress is sideways), the knot may be split apart under load, compromising its strength and security. Knots for Climbers 3 A bend and a loop stressed along their long axes - correct applications in each case A knot stressed sideways (across its long axis) - incorrect application KNOT MANAGEMENT A knot must be dressed, or tied in its most secure orientation. With most knots tied with accessory cord, this means making sure that strands running side by side through a knot do not cross. Knots with crossed strands may not snug together, can jam badly and risk coming loose over time. The manner in which knots are dressed may be quite different, so know how to efficiently dress each knot. To dress a figure-of-eight on a bight, loosely tie the knot and then work out any twists or crosses Think of the rope strands as freeway lanes. Just like the lanes of a freeway, the cords should remain side by side,
never cross at any point along their path. When the crosses have been worked out, tighten the knot A loosely tied figure-eight on a bight Knots must also be firmly tightened. In most cases its not enough to simply pull on the rope strands on either side of the knot in an effort to tighten it. With the figure-of-eight bend and the figure-of-eight followthrough, for example, both strands on each side of the knot must be pulled tightly (four pulls total) Knots for Climbers 4 Tightening a figure-of-eight bend Once a knot has been loaded, it can be difficult to loosen. Its best to break the strands which run perpendicularly to the long axis of the knot away from the knots center. Make sure to work both sides of the knot. Loosening a Flemish bend Bends, loops and hitches are dressed and tightened differently, so know the specific ways to efficiently tie, dress, tighten and loosen each knot . Keep in mind that working with tubular webbing is much different than tying knots with
rope or accessory cord. Considerations for working with webbing are addressed below, in the section ʻWebbing Knotsʼ. TIE-IN AND CLIP-IN KNOTS The most popular tie-in and clip-in knots are members of the figure-of-eight family. When tying into the end of the rope, use the figure-of-eight follow-through. Its strong, stays securely tied and is relatively easy to untie once loaded. Tying a figure-of-eight follow through When youre at an anchor station on a climb and need to attach yourself to an anchor for safety, you can tie a loop into the rope with a figure-of-eight on a bight and clip the loop to an anchor carabiner. Knots for Climbers 5 Tying a figure-of-eight on a bight FRICTION KNOTS Friction knots are invaluable for rescue situations. They serve as ascending devices when you need to ascend a set of jammed rappel ropes and as a means to transfer the load to an anchor during a belay escape. There are many friction knots to choose from. Some are more appropriate than
others in a given situation. In all cases, friction knots work the same way, by clamping onto the rope when tensioned, and sliding along the rope when tension is released (or allowing the rope to slide through the knot). In order for a friction knot to grip, the cord from which it is tied must be smaller in diameter than the rope to which it is attached. It also helps if the cord is relatively supple so that it can easily conform to the ropes circular shape. The prusik knot is tied by wrapping consecutive girth hitches around the rope. A two-wrap prusik provides sufficient grip for ascending a rope. If the load is heavier, a three-wrap prusik is necessary Always use a three-wrap prusik for rescue work. A three wrap prusik Tie 3 consecutive girth hitches. A single girth-hitch is shown at left. Prusik knots tied with one-inch tubular webbing slip on the rope, whereas prusiks tied with 9/16" webbing hold fine, but are difficult to slide along the rope due to the small bulk. Its
best to use accessory cord to tie a prusik knot. Knots for Climbers 6 The Klemheist knot works very well when tied with webbing (unlike the prusik knot). Its also faster to tie when using a long (16 to 20) cordelette, especially if the ends of the cordelette are left open (untied). Tying a prusik knot with a long cordelette is more time consuming, as the ends must be repeatedly passed through the knot. Klemheist knot Bachmann knot The Bachmann knot incorporates a carabiner as a handle, making it easier to slide the knot along the rope, a helpful feature when ascending a rope. The carabiner also enables the knot to be self-tending in a rescue system. This knot also works well when tied with webbing USEFUL HITCHES One of the most useful knots is the Müenter hitch. It can be used in lieu of a belay device and as a component of a tension release mechanism. Its advantageous to be able to tie this knot one handed, especially for a lone rescuer who may have to attend to other
tasks. Use a locking carabiner when tying a Müenter hitch. A pear-shaped carabiner may be needed to allow the knot to be flipped from one side of the carabiner to the other, especially when larger diameter rope is used. Knots for Climbers 7 Tying a one-handed Müenter hitch Grab the non-loaded strand and pass it behind the loaded strand. Pull the strand up into a bight. Do not twist or flip this strand. Clip the bight into the carabiner and lock the gate. When used in a tension release mechanism, the Müenter hitch must be backed up. Tie a slippery hitch followed by a non-slippery overhand. Tying off a Müenter hitch Keep your brake hand on the rope! With your free hand, pull a bight around the loaded rope and through a slot formed immediately in front of the Müenter hitch. The knot is now slippery, meaning that the bight can easily be pulled out. For security, a slippery tie-off should always be backed up. An overhand on a bight is an excellent choice. The finished
product. Notice the overhand on a bight is snugged up against the slippery tie-off. Knots for Climbers 8 The Mariners hitch is a useful tension release knot. Its simple to tie, especially with an open-ended (untied) cordelette. The major disadvantage to the Mariners hitch is that it cannot be tied with a single strand of cord. Mariners hitch When tying the Mariners hitch, wrap the cord twice around the body of the carabiner and then around the strands with a minimum of five wraps. Finish the knot off with a safety overhand A clove hitch is an adjustable knot that grips securely onto the round surface of a carabiner. The clove hitch is particularly useful for clipping into an anchor, because it allows for quick adjustment of the amount of slack or tension in the rope. Tying a clove hitch Using identical hand motions, tie two loops into the rope. Slide one of the loops in front of the other. It will be clear which loop to slide as one choice results in a clove hitch and the
other produces no knot at all. In this case, the loop on the right is slid in front of the loop on the left. Do not twist of fold the loop Clip the loops into a locking carabiner, tighten the hitch and lock the gate. Knots for Climbers 9 Always use a locking carabiner when tying a clove hitch and tighten the knot securely. A loose clove hitch can slip when loaded and weld abrade the rope. A loose knot can also detach from the carabiner For these reasons some climbers favor the figure-of-eight on a bight as a method for attaching to an anchor. If you know how to tie a one-handed clove hitch you can tie and adjust the knot at the same time. Tying a one-handed clove hitch Pull the non-loaded strand behind the loaded one. Twist this strand into a loop. You have two choices for twisting this strand. Youll always get it right if you twist the rope into a loop such that the length of the non-loaded strand ends up behind, rather than in front of the loop. Tighten the knot and lock
the carabiner. OTHER USEFUL KNOTS One of the most secure knots is the grapevine (a.ka double fishermanʼs) Climbers use it to join accessory cord, or even webbing, into slings. The knot definitely stays tied, especially once it is loaded Tying the knot is easier than it appears. Tie one side, flip the knot around and then tie the same knot again (using identical hand motions). The grapevine is tightened by pulling the strands on either side of the knot away from each other. Its tied properly when the four parallel strands are on the same side of the knot. If the parallel strands are opposite each other, a portion of the knot sticks out on either side, making these areas susceptible to abrasion. Knots for Climbers 10 Pass the working end between the “x” and the stationary strand of rope. Begin by tying one end of the rope around the other end. Notice the “x” pattern formed Finish the other half of the grapevine by flipping the knot end to end and repeating the above
sequence of hand motions. To adjust the length of end tail, slide the knot along the stationary strand. Tighten the knot Tying a grapevine WEBBING KNOTS Overhand knots are used almost exclusively when working with sling webbing. The water knot (Ring bend) is used to join pieces of webbing into slings or runners. Water knot (ring bend) The water knot has an uncanny ability to work itself loose over time. Dressing the knot properly, as shown below, adds to its security. Nevertheless, get in the habit of checking the water knot frequently Itʼs also a good idea to incorporate long (at least 3") tails into the knot when tying it. Dressing a water knot To dress the water knot, pinch the webbing on each side of the knot and then give each strand a good tug. The finished product will look like a tie Knots for Climbers 11 Itʼs also possible to use a grapevine knot to join webbing into runners. The grapevine cinches tightly when loaded, adding an element of security lacking
with the water knot. The grapevine, however, may be impossible to untie once loaded, a definite disadvantage when trying to tie runners together. Some climbers carry a selection of runners joined with water knots and grapevines in order to take advantage of the benefits of each knot. Tie an overhand on-a-bight to form a loop in the middle of a runner, or in one end of an individual strand of webbing (e.g for girth hitching a piece of webbing to a prusik in a tension release mechanism) Overhand on a bight at the end of a sling