Datasheet
Year, pagecount:2017, 5 page(s)
Language:English
Downloads:5
Uploaded:December 10, 2018
Size:1 MB
Institution:
-
Comments:
Attachment:-
Download in PDF:Please log in!
Comments
No comments yet. You can be the first!


Content extract
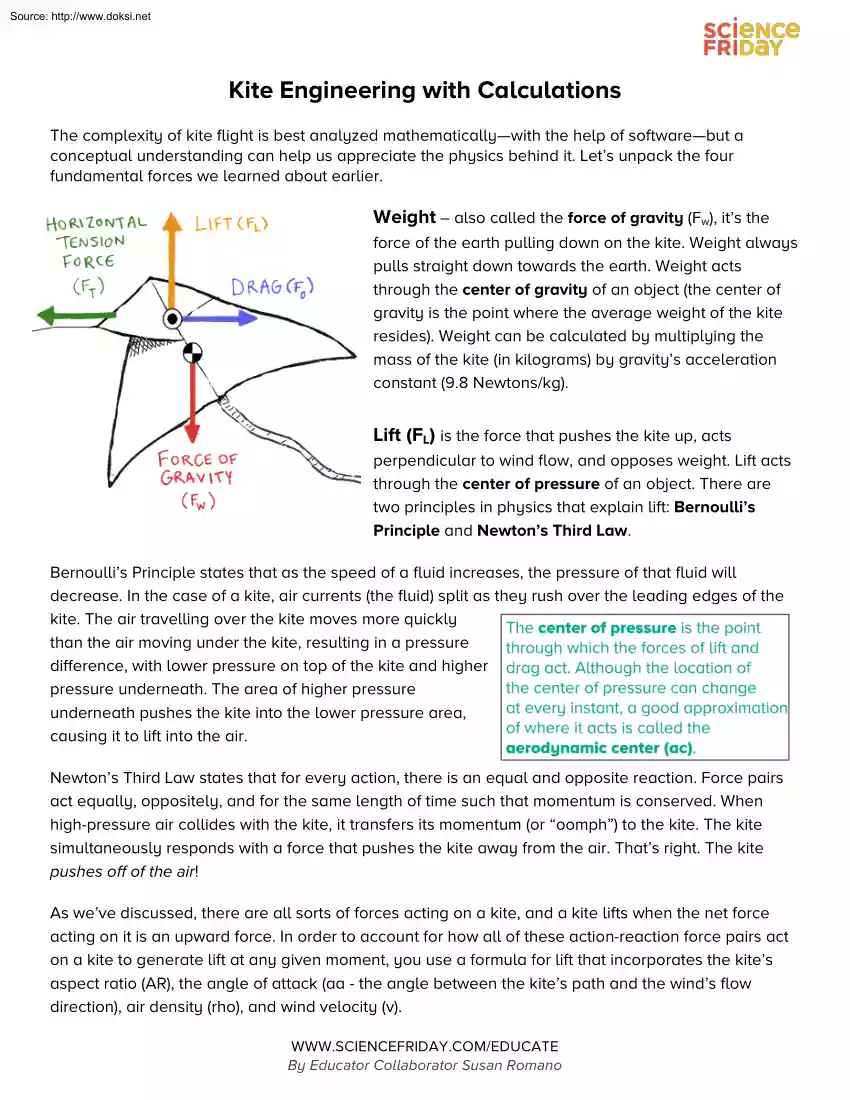
Source: http://www.doksinet Kite Engineering with Calculations The complexity of kite flight is best analyzed mathematicallywith the help of softwarebut a conceptual understanding can help us appreciate the physics behind it. Let’s unpack the four fundamental forces we learned about earlier. Weight – also called the force of gravity (Fw), it’s the force of the earth pulling down on the kite. Weight always pulls straight down towards the earth. Weight acts through the center of gravity of an object (the center of gravity is the point where the average weight of the kite resides). Weight can be calculated by multiplying the mass of the kite (in kilograms) by gravity’s acceleration constant (9.8 Newtons/kg) Lift (FL) is the force that pushes the kite up, acts perpendicular to wind flow, and opposes weight. Lift acts through the center of pressure of an object. There are two principles in physics that explain lift: Bernoulli’s Principle and Newton’s Third Law. Bernoulli’s
Principle states that as the speed of a fluid increases, the pressure of that fluid will decrease. In the case of a kite, air currents (the fluid) split as they rush over the leading edges of the kite. The air travelling over the kite moves more quickly than the air moving under the kite, resulting in a pressure difference, with lower pressure on top of the kite and higher pressure underneath. The area of higher pressure underneath pushes the kite into the lower pressure area, causing it to lift into the air. Newton’s Third Law states that for every action, there is an equal and opposite reaction. Force pairs act equally, oppositely, and for the same length of time such that momentum is conserved. When high-pressure air collides with the kite, it transfers its momentum (or “oomph”) to the kite. The kite simultaneously responds with a force that pushes the kite away from the air. That’s right The kite pushes off of the air! As we’ve discussed, there are all sorts of forces
acting on a kite, and a kite lifts when the net force acting on it is an upward force. In order to account for how all of these action-reaction force pairs act on a kite to generate lift at any given moment, you use a formula for lift that incorporates the kite’s aspect ratio (AR), the angle of attack (aa - the angle between the kite’s path and the wind’s flow direction), air density (rho), and wind velocity (v). WWW.SCIENCEFRIDAYCOM/EDUCATE By Educator Collaborator Susan Romano Source: http://www.doksinet Tension force (FT) is the pull from the kite string originating with the person holding the string. Tension force acts on the keel or where the string is attached. Kite strings are not usually held perfectly horizontally or vertically, so for the purposes of calculation, the tension force is separated into horizontal and vertical components. NOTE: For the purposes of this activity, we are ignoring the sag of the line. Drag (FD) is the wind’s push on the kite. Drag acts
through the center of pressure Since higher elevation winds blow fairly parallel to the earth, the drag force from the wind acts opposite the horizontal component of the tension force. When you think of the kites you’ve seen swinging like giant pendulums in the sky, you know there must be more than just these four forces at work! The main forces don’t all act through the same point on a kite, and for this reason, the kite often pivots. Lift and dragwhat are called aerodynamic forcesact through the center of pressure Weight acts through the center of gravity, and tension acts through the keel (also called the bridle point on some kites). Kites experience torques, or twisting forces, around their keel (or bridle point) and will not be stable if the torques aren’t balanced. In order for a kite to remain stable as it goes up, its center of gravity has to be below or just about even with its aerodynamic center. When all forces balance, a kite will “sit” in the sky. When designing
a kite, the effectiveness of its flight depends on where the kite’s center of pressure and center of gravity are located in the overall design. For more information about kite flight, check out this site from NASA. For explanations of Newton’s Laws, check out The Physics Classroom. WWW.SCIENCEFRIDAYCOM/EDUCATE By Educator Collaborator Susan Romano Source: http://www.doksinet Let’s Build a Kite Let’s use the engineering design process to build a kite. The kite shown to the right is a delta kite (the Greek symbol for delta is a triangle). Delta kites like this one fly well in light to moderate wind. Illustration by Elah Feder Materials (per kite) 6 reeds in 4 foot (1.2 meter) lengths 7 flexible straws Thin plastic drop cloth Packing tape ~ 20 meters thread or string Cardboard tube or stick (to wind string around) Black marker Meter stick Pair of sharp scissors Susan’s Kite Building Tips Be careful pulling the reeds out of the fencing bundle; they are sharper
than they look. When you’re cutting plastic with scissors, rather than cutting up and down like you do when you normally cut with scissors, find a sharp spot on the scissors, keep them open, and push through the plastic to slice it. Don’t worry if the edges are ragged or your lines aren’t perfectly straight. Keep the plastic drop cloth and the tape apart until you want to bring them together. Should tape stick to the plastic in an unwanted place, cut the tape rather than tear the plastic. Kite repairs are easy. If a reed breaks, use a short piece to “splint” the broken section, and tape it on either side. If the plastic rips, tape it Build a delta kite using the image above as a guide. You can access Susan’s instructions for building a delta kite here<link to Building Instructions pdf>. WWW.SCIENCEFRIDAYCOM/EDUCATE By Educator Collaborator Susan Romano Source: http://www.doksinet Use your Kite Engineering with Calculations Guide Sheet for the rest of this
activity. Pre-Launch 1. Create a scaled sketch of your delta kite on your Kite Engineering with Calculations Guide Sheet. Label the sketch with spar and span lengths, and angles 2. Mass (m) and measure the span of your kite Note these measurements on your Kite Engineering with Calculations Guide Sheet. Use those measurements, to calculate weight, surface area, and aspect ratio using the formulas below. • • • Weight (Fw) Fw = m * 9.8 N/kg; Surface area (A) - divide your kite into triangles, calculate areas in square meters and obtain sum; Aspect Ratio (AR) AR = s2 / A 3. Find the approximate center of pressure (aerodynamic center) and center of gravity • Locate your kite’s aerodynamic center. This point is located below the front tip of the kite, one quarter of the way down the vertical spar. Create a pressure point mark on the kite • Locate the center of gravity by balancing the kite on your finger such that it remains horizontal. The point where the kite is balanced is
the center of gravity Create a center of gravity mark on your kite at that location. 4. Make a prediction Based on your markings for center of pressure and center of gravity, predict the stability of your kitei.e will your kite fly? Kite Launch & Data Collection • To fly your kite, pick a time when there’s a light breeze. Measure the wind speed (v) and air density (ρ), and note them on your Kite Engineering with Calculations Guide Sheet. • Have a camera ready to take pictures that capture a side view of your kite. These will be used to determine the angle of attack. • Turn your back to the wind, and let the string out as necessary. The wind will provide lift and drag. Pull on the string (this provides the tension), and if there’s not enough breeze, you can run with the kite trailing behind you. Take pictures (or video) from the side as the kite lifts into the air. • Once the kite is up in the air, measure tension (FT) in Newtons by making a loop in the kite
string and using a spring scale. • Adjust the bracing spars to accommodate the wind. In a stronger wind, slide the bracing spars away from the vertical spar to bend the leading edge spars back. In a lighter wind, slide the bracing spars forward to flatten the kite. Patch as needed • Have a team member take videos or pictures to document your kite’s performance. WWW.SCIENCEFRIDAYCOM/EDUCATE By Educator Collaborator Susan Romano Source: http://www.doksinet Analyze and Conclude • • Measure the angle of attack (a) using your photos/video with either a protractor or video analysis software, like Vernier’s Logger Pro. Be sure to convert degrees to radians using your calculator. Calculate the lift coefficient (Clo) – a number that describes lift characteristics) and then lift (L) using the formulas below. • Clo = 2*πa • L = Clo*Aρ(v2/2) • Describe the kite’s flight as accurately as possible using the terms outlined on the Kite Image. The success of the
flight doesn’t matterwhat matters is that your observations provide detailed data. Reflect on your pre-flight prediction Did you observe instability in your kite? • What four forces did the kite experience? Are these forces that a ski jumper would encounter? Explain. • Select a problem or issue you encountered during flight that you think could be addressed by redesigning the kite. What is the problem or issue you wish to address? Plan your redesign Part of the fun of engineering is the freedom to improve on what has already been built, but redesigning a kite needs to be done thoughtfully. Kites fly upward when the lift is greater than or equal to the weight, and drag and tension are in balance. Since the dynamics that affect kite flight are complex, it’s a good idea to learn which variables (e.g location of center of pressure and center of gravity, wingspan, point where control line attaches) influence the main forces of flight and make alterations from there. Here are a
few redesign suggestions to get you thinking. o Change the span/surface area of your kite. How large and how small can this basic delta kite be so that it still flies? o Change the mass of the kite. Perhaps you want a sturdier kite and want to substitute different building materials (e.g swap the reeds for dowels) o Change one of the kite parts in the original design. Really want to be adventurous? Change one of the kite parts in the original design, like the length of the vertical spar. Research your aspect carefully by looking at NASA’s Kite Index, which details some of the ways that changes can affect forces on your kite. Look at your schematic for the different kite parts. Research kite designs online. Start with NASA’s Kite Index, kiteplansorg and mybestkitecom Look for information on specific redesign options. Read up on the science of kite building There are so many kite resources to explore! Build and launch your new kite. Be sure to take new measurements for your new
design so that you can calculate and compare the lift between the two kites. Feel free to continue redesigning your delta kite Make sure that you calculate lift for each of your designs. WWW.SCIENCEFRIDAYCOM/EDUCATE By Educator Collaborator Susan Romano