A doksi online olvasásához kérlek jelentkezz be!
A doksi online olvasásához kérlek jelentkezz be!
Nincs még értékelés. Legyél Te az első!
Legnépszerűbb doksik ebben a kategóriában


Tartalmi kivonat
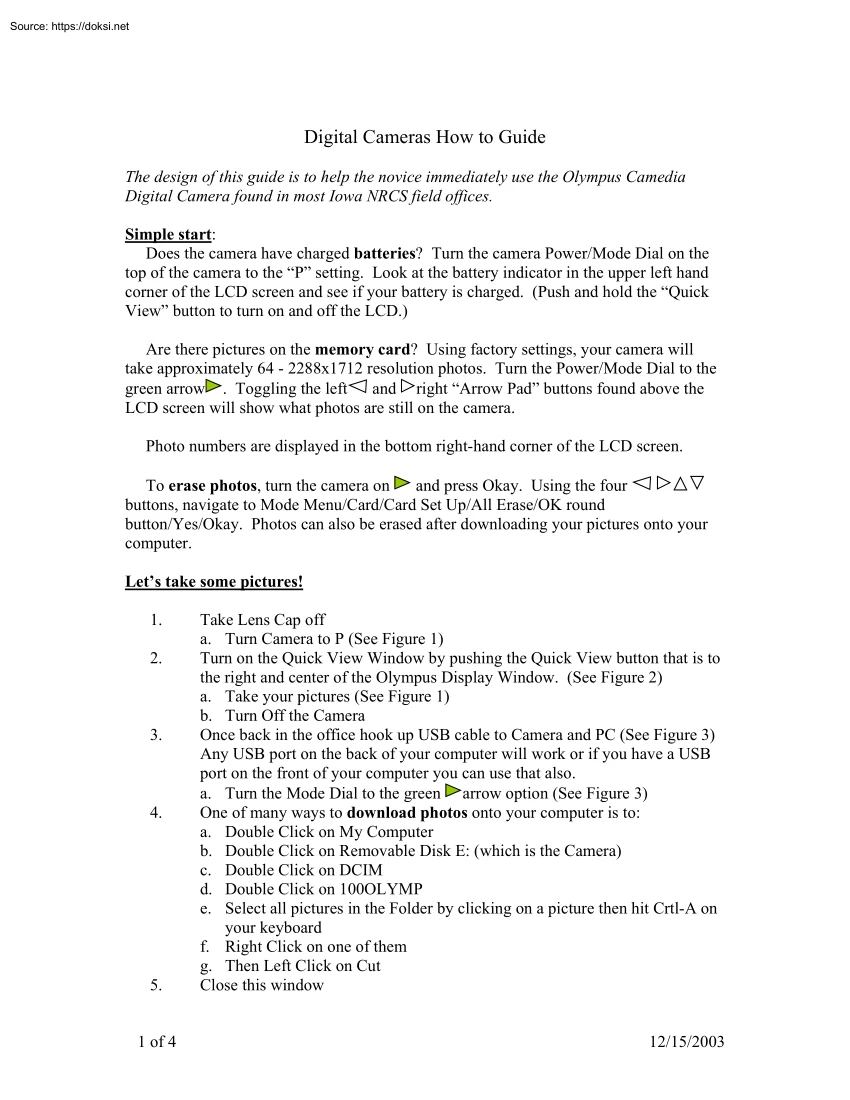
Digital Cameras How to Guide The design of this guide is to help the novice immediately use the Olympus Camedia Digital Camera found in most Iowa NRCS field offices. Simple start: Does the camera have charged batteries? Turn the camera Power/Mode Dial on the top of the camera to the “P” setting. Look at the battery indicator in the upper left hand corner of the LCD screen and see if your battery is charged. (Push and hold the “Quick View” button to turn on and off the LCD.) Are there pictures on the memory card? Using factory settings, your camera will take approximately 64 - 2288x1712 resolution photos. Turn the Power/Mode Dial to the green arrow . Toggling the left and right “Arrow Pad” buttons found above the LCD screen will show what photos are still on the camera. Photo numbers are displayed in the bottom right-hand corner of the LCD screen. To erase photos, turn the camera on and press Okay. Using the four buttons, navigate to Mode Menu/Card/Card Set Up/All Erase/OK
round button/Yes/Okay. Photos can also be erased after downloading your pictures onto your computer. Let’s take some pictures! 1. 2. 3. 4. 5. 1 of 4 Take Lens Cap off a. Turn Camera to P (See Figure 1) Turn on the Quick View Window by pushing the Quick View button that is to the right and center of the Olympus Display Window. (See Figure 2) a. Take your pictures (See Figure 1) b. Turn Off the Camera Once back in the office hook up USB cable to Camera and PC (See Figure 3) Any USB port on the back of your computer will work or if you have a USB port on the front of your computer you can use that also. a. Turn the Mode Dial to the green arrow option (See Figure 3) One of many ways to download photos onto your computer is to: a. Double Click on My Computer b. Double Click on Removable Disk E: (which is the Camera) c. Double Click on DCIM d. Double Click on 100OLYMP e. Select all pictures in the Folder by clicking on a picture then hit Crtl-A on your keyboard f. Right Click on one of
them g. Then Left Click on Cut Close this window 12/15/2003 6. 7. Double Click on My Computer a. Go to either the H: (personal) or S: (shared) drive depending where you want to save the pictures. Assuming you want to save the pictures to the shared drive: i. S drive will show up as shared on Servername ii. If S: drive then you need to go to Service CenterNrcs iii. Create a folder in here called pictures then open it by double clicking on the folder. (Talk with office about how the you are going to store the pictures taken) b. Right Click in the white area and Paste You have now saved the pictures so you can do whatever you need to with them now. If the pictures are on the shared drive, others can work with them as well. Figure 1 Zoom Lever Picture Button Power/Mode Dial Figure 2 LCD Display on Button Figure 3 2 of 4 12/15/2003 USB Port Photo Editing Office XP operating systems come equipped with basic photo editing software, but it can be a challenge to find it. Using
the following steps, you will find PhotoED software and put a shortcut to your desktop to launch quickly this software program. a. b. c. d. e. f. g. h. i. j. k. Click on “Start” in the bottom left hand corner of this screen. Click “Search” Click “All Files and Folders” Type filename: “PhotoEd” Search in Local Disk C Right click “PhotoEd.exe” Highlight create shortcut and left click Create shortcut on desktop Close “Search Results” screen Double left click Microsoft Photo Editor Click on File/Open/Choose a photo to work on Camera Comments For more specific information or an in depth look at operating this camera, refer to the camera guide found on the CD that came with the camera. The CD reference material is quite good. 3 of 4 12/15/2003 Your camera’s settings will revert to factory settings every time you shut it off. So, if you are in the field, and you find all your shots are out of focus, shut off the camera and turn it on again. You now have a
fresh start to picture taking Photos for the web are usually much smaller than 2288x1712 in size. One way to reduce the photo quality to web size is to copy the picture file to your computer hard drive, right mouse click on the photo/send to/mail recipient/and email yourself the smaller picture version. Another way to reduce picture size is to take smaller, reduced quality photos. (See chart below.) To set your camera to take smaller resolution photos, turn your camera on to P, press and hold the Quick View button until the LCD turns on, press “OK”, press once, press twice to highlight SQ1 or SQ2, press twice highlighting “Normal” and then press “OK” until the LCD screen returns to normal. By reduced your picture resolution, you tailor the size and quality of the photos to fit your needs and increase the number of pictures you can fit on the memory card. Caution: When reducing the quality of your photos you are stuck with that quality. Taking high quality photos and using
the computer to reduce the size of your shots to fit your needs is easy. However, it is impossible to take a low-resolution photo and increase its resolution to fit a higher quality use. Record Mode HQ Normal (Default) SQ1 Normal SQ2 Normal Picture Size 2288x1712 Uses All uses Print Size 10 by 15 Shots/Memory 64 1600x1200 640x480 PowerPoint/Reports Web 5x7 Wallet 128 661 Last Thought If you want to improve your picture taking ability, simply take many photos. The more pictures you take, the better the photographer you will become. Enjoy using this conservation tool! Thanks to Sheila O’Riley for developing material used in this guide. 4 of 4 12/15/2003
 1791. november 11-én született Kecskeméten; iparos család sarja. Elemi tanulmányait 1798-1802 között a kecskeméti római katolikus iskolában végzi. A gimnáziumi éveket a pesti és a kecskeméti piaristáknál tölti. Az egyetemi tanulmányokra előkészítő filozófiai osztályokat a szegedi piaristáknál és a pesti egyetemen végzi. 1810-13 között jogot hallgat Pesten, de