Datasheet
Year, pagecount:2015, 2 page(s)
Language:English
Downloads:9
Uploaded:October 07, 2019
Size:8 MB
Institution:
-
Comments:
Attachment:-
Download in PDF:Please log in!
Comments
No comments yet. You can be the first!Most popular documents in this category


Content extract
Source: http://www.doksinet Tech Tips Ford Focus 2.0-liter 16V timing belt guide Significant errors are frequently committed when changing the timing belt. ContiTech Power Transmission Group provides fitters a step-by-step explanation of how to change the belt correctly in a Ford Focus 2.0-liter 16 V with engine code EDDB, EDDC, EDDD. T he manufacturer recommends inspecting and, if necessary, changing the timing belt and tensioning pulley at 160,000 km or after 10 years. Tip: Replace the tensioning pulley, idlers and water pump at the same time as changing the timing belt. Although the water pump is driven by the multi V-belt rather than the timing belt, in this engine the pump is mounted behind the timing belt drive, and the timing belt idler is attached to the water pump. Should the water pump fail later, the entire process has to be repeated using new parts, since Ford has forbidden the continued use of used timing belts in this case. It is essential, therefore, to change the
water pump as part of the package, in order to avoid later failures with unnecessary costs. The labor time is 2.2 hours Fitters need the following special tools for the procedure: 1. Camshaft locking tool - OE (303-376) 2. Crankshaft locking tool - OE (303-574) 3. Counterhold - OE (205-072) Preparatory work Identify the vehicle using the engine code. Disconnect the vehicle battery. Do not turn the crankshaft and camshaft once the timing belt has been removed. Turn the engine in the normal direction of rotation (clockwise) unless otherwise specified. Turn the engine only at the crankshaft pulley, not at any other sprockets. Comply with all the manufacturer’s tightening torques. Jack up and prop the front of the vehicle, so that the front engine mount is not under strain. Removal Power steering reservoir (do not detach hoses), ancillary unit belt, coolant expansion reservoir (hoses do not need to be detached), water pump belt pulley, upper and lower timing covers, front engine mount,
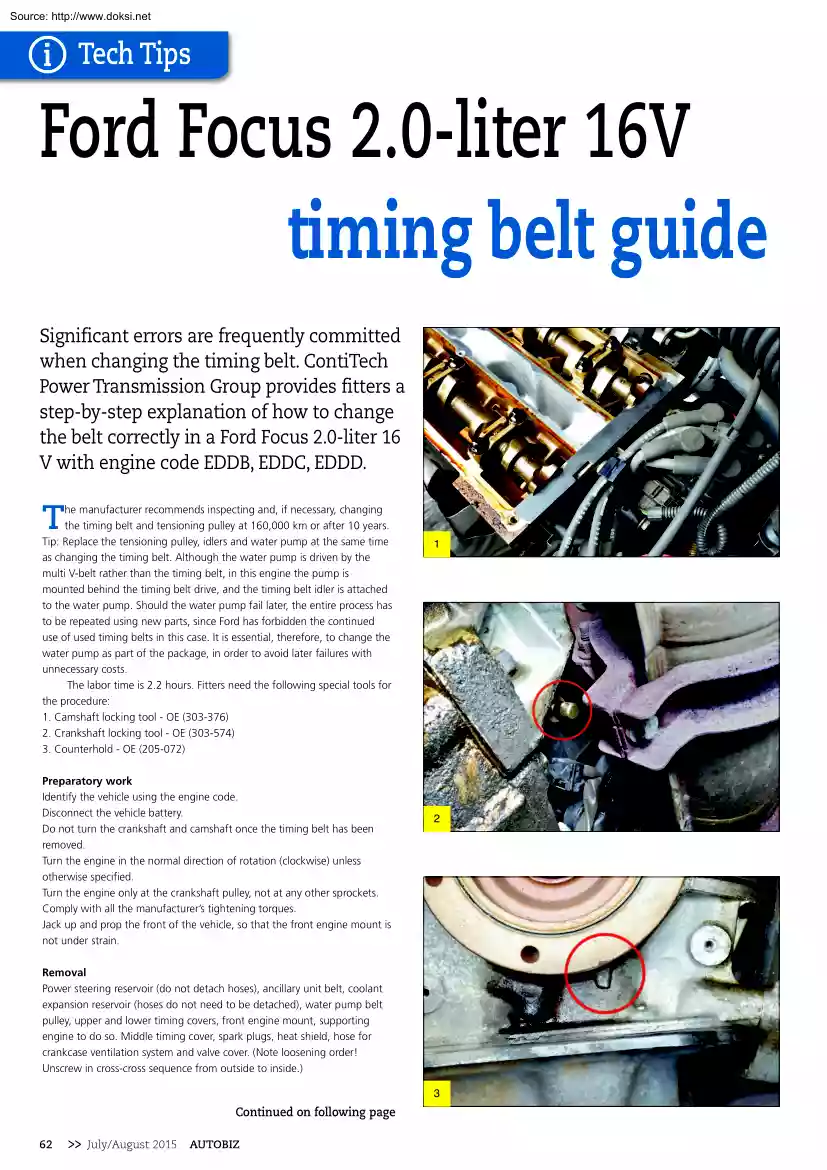
supporting engine to do so. Middle timing cover, spark plugs, heat shield, hose for crankcase ventilation system and valve cover. (Note loosening order! Unscrew in cross-cross sequence from outside to inside.) Continued on following page 62 >> July/August 2015 AUTOBIZ 1 2 3 Source: http://www.doksinet Tech Tips Continued from previous page Removal – camshaft belt 1. Set valve timings to TDC mark of cylinder 1 2. Locate camshaft locking tool - OE (303-376) on camshaft (Fig 1) 3. Insert crankshaft locking tool - OE (303-574) To do so, unscrew plug from engine block and screw in locking tool (Fig. 2) Observe mark on crankshaft belt pulley (Fig. 3) 4. Loosen tensioning pulley bolt and release tension in timing belt/tensioning pulley. To release tension, turn tensioning pulley hexagon socket clockwise 5. Remove crankshaft belt pulley 6. Timing belt can now be removed Installation – camshaft belt 1. Loosen camshaft sprocket bolts To do so, use counterhold OE (205-072)
(Fig. 4) Check or reset valve timing settings in same way as for removal (items 1 to 3). 2. Fit new components Ensure that tensioning pulley retaining bracket (Fig 5) is correctly seated in metal cover recess (Fig. 6)) 3. Fit timing belt counterclockwise, starting at crankshaft pulley Take care to ensure that timing belt is not kinked during fitting. Timing belt must be tight between sprockets on tight side. 4. Tension timing belt counterclockwise using tensioning pulley, until tensioning pulley marks are aligned (Figs. 7 and 8) Tighten tensioning pulley bolt to torque of 25 Nm. 5. Refit crankshaft belt pulley Please use counterhold when doing so, and tighten to torque of 115 Nm. 6. Remove locking tools and tighten bolts of exhaust camshafts to torque of 68 Nm and intake camshafts to 68 Nm. 7. Turn engine by hand through two revolutions in direction of engine travel Set engine to TDC cylinder 1. Insert camshaft locking tool and crankshaft locking tool. If locking tool cannot be
inserted, correct valve timings Check timing belt tension again. 8. Remove locking tools, screw plug (24 Nm) back into cylinder block Remove holding tool and fit components in reverse order of removal. 9. Fitting: Cylinder head cover (bolts 1st stage 2 Nm, 2nd stage 7 Nm), spark plugs, upper timing belt guard (10 Nm) together with lower timing belt guard (7 Nm), water pump belt pulley (24 Nm), ancillary unit belt. Engine mount bolts (bolt(s) 48 Nm; nut(s) 80 Nm, engine bracket bolts 50 Nm) and engine mount. 10. Record changing of original ContiTech timing belt on sticker supplied and stick this in engine compartment. Then carry out a test drive. 4 64 5 6 7 8 >> July/August 2015 AUTOBIZ
water pump as part of the package, in order to avoid later failures with unnecessary costs. The labor time is 2.2 hours Fitters need the following special tools for the procedure: 1. Camshaft locking tool - OE (303-376) 2. Crankshaft locking tool - OE (303-574) 3. Counterhold - OE (205-072) Preparatory work Identify the vehicle using the engine code. Disconnect the vehicle battery. Do not turn the crankshaft and camshaft once the timing belt has been removed. Turn the engine in the normal direction of rotation (clockwise) unless otherwise specified. Turn the engine only at the crankshaft pulley, not at any other sprockets. Comply with all the manufacturer’s tightening torques. Jack up and prop the front of the vehicle, so that the front engine mount is not under strain. Removal Power steering reservoir (do not detach hoses), ancillary unit belt, coolant expansion reservoir (hoses do not need to be detached), water pump belt pulley, upper and lower timing covers, front engine mount,
supporting engine to do so. Middle timing cover, spark plugs, heat shield, hose for crankcase ventilation system and valve cover. (Note loosening order! Unscrew in cross-cross sequence from outside to inside.) Continued on following page 62 >> July/August 2015 AUTOBIZ 1 2 3 Source: http://www.doksinet Tech Tips Continued from previous page Removal – camshaft belt 1. Set valve timings to TDC mark of cylinder 1 2. Locate camshaft locking tool - OE (303-376) on camshaft (Fig 1) 3. Insert crankshaft locking tool - OE (303-574) To do so, unscrew plug from engine block and screw in locking tool (Fig. 2) Observe mark on crankshaft belt pulley (Fig. 3) 4. Loosen tensioning pulley bolt and release tension in timing belt/tensioning pulley. To release tension, turn tensioning pulley hexagon socket clockwise 5. Remove crankshaft belt pulley 6. Timing belt can now be removed Installation – camshaft belt 1. Loosen camshaft sprocket bolts To do so, use counterhold OE (205-072)
(Fig. 4) Check or reset valve timing settings in same way as for removal (items 1 to 3). 2. Fit new components Ensure that tensioning pulley retaining bracket (Fig 5) is correctly seated in metal cover recess (Fig. 6)) 3. Fit timing belt counterclockwise, starting at crankshaft pulley Take care to ensure that timing belt is not kinked during fitting. Timing belt must be tight between sprockets on tight side. 4. Tension timing belt counterclockwise using tensioning pulley, until tensioning pulley marks are aligned (Figs. 7 and 8) Tighten tensioning pulley bolt to torque of 25 Nm. 5. Refit crankshaft belt pulley Please use counterhold when doing so, and tighten to torque of 115 Nm. 6. Remove locking tools and tighten bolts of exhaust camshafts to torque of 68 Nm and intake camshafts to 68 Nm. 7. Turn engine by hand through two revolutions in direction of engine travel Set engine to TDC cylinder 1. Insert camshaft locking tool and crankshaft locking tool. If locking tool cannot be
inserted, correct valve timings Check timing belt tension again. 8. Remove locking tools, screw plug (24 Nm) back into cylinder block Remove holding tool and fit components in reverse order of removal. 9. Fitting: Cylinder head cover (bolts 1st stage 2 Nm, 2nd stage 7 Nm), spark plugs, upper timing belt guard (10 Nm) together with lower timing belt guard (7 Nm), water pump belt pulley (24 Nm), ancillary unit belt. Engine mount bolts (bolt(s) 48 Nm; nut(s) 80 Nm, engine bracket bolts 50 Nm) and engine mount. 10. Record changing of original ContiTech timing belt on sticker supplied and stick this in engine compartment. Then carry out a test drive. 4 64 5 6 7 8 >> July/August 2015 AUTOBIZ
 Just like you draw up a plan when you’re going to war, building a house, or even going on vacation, you need to draw up a plan for your business. This tutorial will help you to clearly see where you are and make it possible to understand where you’re going.