Értékelések
Nincs még értékelés. Legyél Te az első!
Mit olvastak a többiek, ha ezzel végeztek?


Tartalmi kivonat
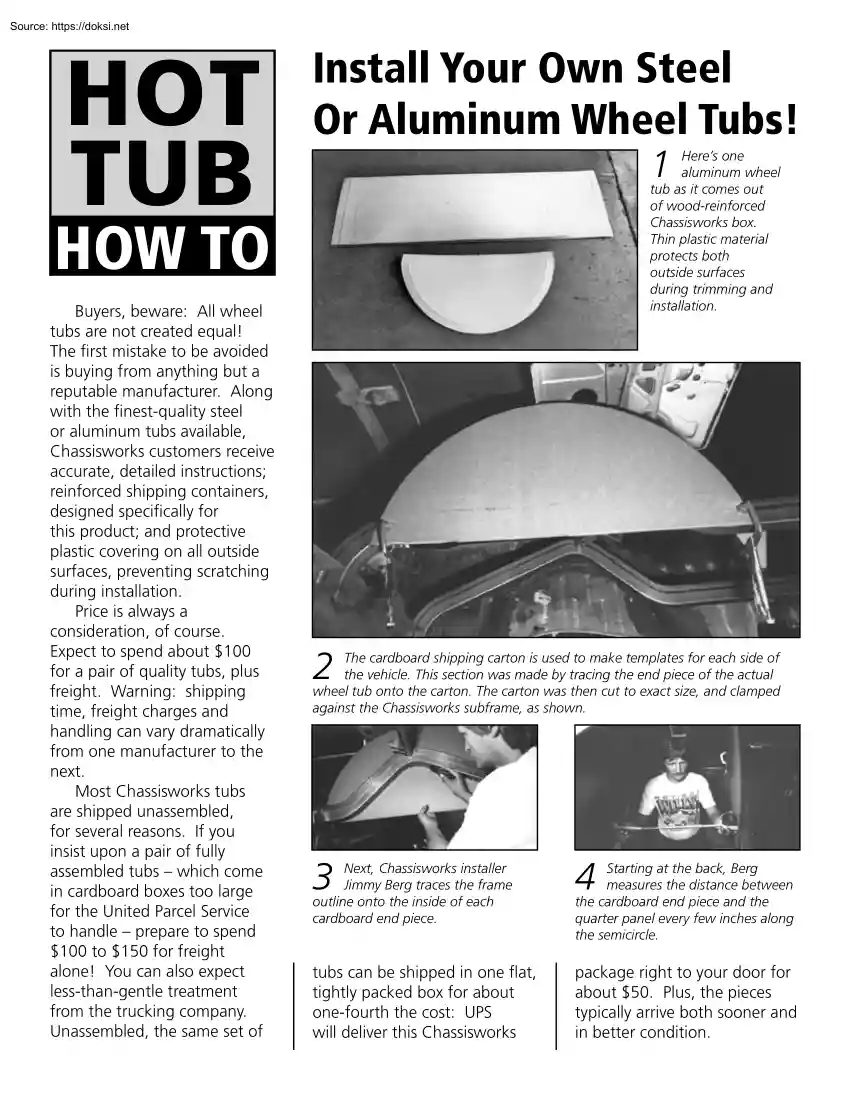
HOT TUB Install Your Own Steel Or Aluminum Wheel Tubs! 1 Here’s one aluminum wheel tub as it comes out of wood-reinforced Chassisworks box. Thin plastic material protects both outside surfaces during trimming and installation. HOW TO Buyers, beware: All wheel tubs are not created equal! The first mistake to be avoided is buying from anything but a reputable manufacturer. Along with the finest-quality steel or aluminum tubs available, Chassisworks customers receive accurate, detailed instructions; reinforced shipping containers, designed specifically for this product; and protective plastic covering on all outside surfaces, preventing scratching during installation. Price is always a consideration, of course. Expect to spend about $100 for a pair of quality tubs, plus freight. Warning: shipping time, freight charges and handling can vary dramatically from one manufacturer to the next. Most Chassisworks tubs are shipped unassembled, for several reasons. If you insist upon a
pair of fully assembled tubs – which come in cardboard boxes too large for the United Parcel Service to handle – prepare to spend $100 to $150 for freight alone! You can also expect less-than-gentle treatment from the trucking company. Unassembled, the same set of 2 The cardboard shipping carton is used to make templates for each side of the vehicle. This section was made by tracing the end piece of the actual wheel tub onto the carton. The carton was then cut to exact size, and clamped against the Chassisworks subframe, as shown. 3 Next, Chassisworks installer Jimmy Berg traces the frame outline onto the inside of each cardboard end piece. 4 Starting at the back, Berg measures the distance between the cardboard end piece and the quarter panel every few inches along the semicircle. tubs can be shipped in one flat, tightly packed box for about one-fourth the cost: UPS will deliver this Chassisworks package right to your door for about $50. Plus, the pieces typically
arrive both sooner and in better condition. 5 At each measuring point, Berg marks the exact distance from the quarter panel onto his cardboard template. HOT TUB HOW TO 6 A straight, 24-inchwide piece of cardboard will simulate each wheel tub’s rounded top section. This pass through the Chassiswork metal roller made the cardboard easier to bend into an arc. 7 Now the two cardboard sections are joined together with strips of masking tape. 9 8 Directly opposite each measurement on the end piece, the corresponding distance is marked on the top section. These marks will form a dotted “cut” line. Cutting along the dotted line, Berg trims excess material from the top section. HOT TUB HOW TO 10 The assembled cardboard tub is clamped in place for final measuring and trimming. 11 The secret to a clean, accurate installation is the included contour tool. The felt tip of a marking pen protrudes through the hole selected and enables a perfect line transfer. 12 On each
side of the body, Berg drags the contour tool along the inner quarter panel. As the point of the tool follows the body contour, the marker draws a corresponding black line onto the cardboard top section. 14 A hammer is used to flatten the edge every few inches, joining the two sections. The rest of the protective plastic remains on the tub. 13 Now it’s time to assemble the uncut metal tubs. After peeling back the edge of the plastic coating (visible at top left of photos), the two preformed edges are fit together as shown. By carefully following each of these installation steps, virtually anyone can custom-fit a pair of Chassisworks wheel tubs. The same procedures apply to aluminum and steel tubs alike. No special tools are required, and the shortcuts shared here should eliminate several hours – and all mistakes – from the typical first-time “tub” job. Our inhouse chassis shop allocates two full days for a relatively simple application, such as the shoebox Chevy
pictured on these pages. Slightly more time is involved with “tubbing” a typical latemodel machine, whose smaller body may present additional installation challenges. Of course, the end result certainly justifies such modest investment of hours and dollars! 15 Next, the cardboard assembly is removed from the car and slipped inside the wheel tub. Reversing direction of the contour tool (but using the same hole as before), Berg transfers the body contour from the cardboard unto the metal top section, as shown. Consequently, the black line on the left becomes the actual cut line for the metal tub. HOT TUB 16 Following the new line, Berg trims the rounded section of the tub to final size. Prior to trimming the flat end piece (to follow the shape of the frame roll), he recommends a trial fitting of the assembled tub on the vehicle. HOW TO 17 18 With the rest of the protective plastic peeled away, a hammer is used to complete the bead. Each fully trimmed tub can be
temporarily clamped or clipped to the frame while mounting holes are drilled 1” up from the frame, 2” apart for mounting rivets. (Note the Cleco pin attaching this tub at the frame’s bend.) 19 No installer should be without this inexpensive tool (available from Chassisworks). Reusable Cleco clips hold tin securely in place prior to and during the actual riveting. 20 Nine Cleco clips temporarily attach the wheel tub. Ultimately, each will be replaced with a blind rivet, and a bead of silicone will seal the tub’s rounded edge to the quarter panel. 22 Here’s a hot rodder’s version of a “hot tub in the back.” Together with a universal Chassisworks subframe, the new tubs nearly doubled this vehicle’s original tire capacity. 21 Careful forward positioning of the new tub ensured uninterrupted operation of the original ’57 Chevy trunk hinges. (In other applications, some modification of the stock hinges may be required.) P/N: 946600 File:
HowTo-007.indd Rev. 03/27/2006
 Megmutatjuk, hogyan lehet hatékonyan tanulni az iskolában, illetve otthon. Áttekintjük, hogy milyen a jó jegyzet tartalmi, terjedelmi és formai szempontok szerint egyaránt. Végül pedig tippeket adunk a vizsga előtti tanulással kapcsolatban, hogy ne feltétlenül kelljen beleőszülni a felkészülésbe.