Comments
No comments yet. You can be the first!
What did others read after this?


Content extract
Managing Users with PHP Sessions and MySQL By Kevin Yank June 14th 2003 Reader Rating: 9.1 NOTE: This article has been newly updated to work on PHP 4.2 or later! Recently, I had occasion to work on a small project with a group of people. We had determined early on that email alone wasn't going to be enough to keep everyone in the loop, so I was tasked with building a small Web site for the project. It would contain a simple message board, a place where we could upload documents and other files for the rest of the team to use, and contact information for the various team members. For many of these features to work, I knew that I'd need users to log in before accessing the relevant parts of the site. What I needed was a system that would let users register for a user ID to access to the site, then immediately use that ID without any intervention on my part. In this article, I shall provide an overview of the system I developed, beginning in the first half with the user signup
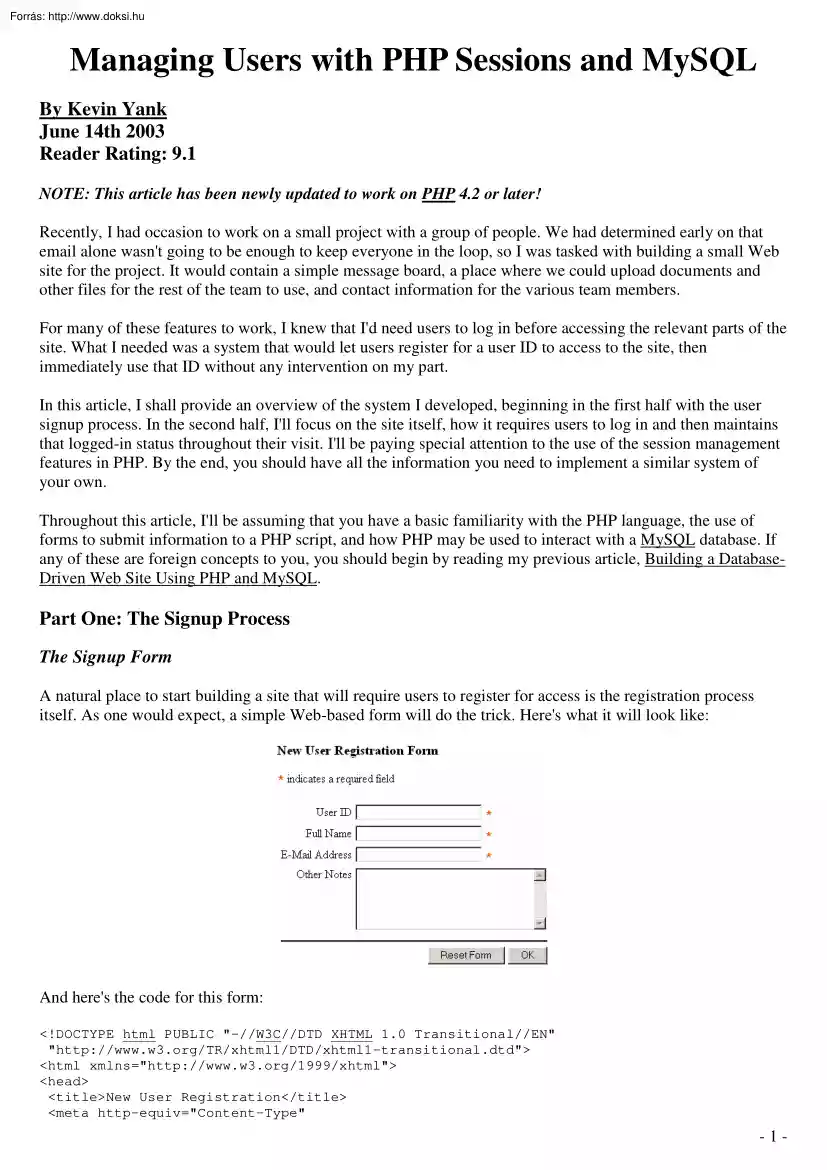
process. In the second half, I'll focus on the site itself, how it requires users to log in and then maintains that logged-in status throughout their visit. I'll be paying special attention to the use of the session management features in PHP. By the end, you should have all the information you need to implement a similar system of your own. Throughout this article, I'll be assuming that you have a basic familiarity with the PHP language, the use of forms to submit information to a PHP script, and how PHP may be used to interact with a MySQL database. If any of these are foreign concepts to you, you should begin by reading my previous article, Building a DatabaseDriven Web Site Using PHP and MySQL. Part One: The Signup Process The Signup Form A natural place to start building a site that will require users to register for access is the registration process itself. As one would expect, a simple Web-based form will do the trick Here's what it will look like: And
here's the code for this form: <!DOCTYPE html PUBLIC "-//W3C//DTD XHTML 1.0 Transitional//EN" "http://www.w3org/TR/xhtml1/DTD/xhtml1-transitionaldtd"> <html xmlns="http://www.w3org/1999/xhtml"> <head> <title>New User Registration</title> <meta http-equiv="Content-Type" -1- content="text/html; charset=iso-8859-1" /> </head> <body> <h3>New User Registration Form</h3> <p><font color="orangered" size="+1"><tt><b>*</b></tt></font> indicates a required field</p> <form method="post" action="<?=$ SERVER['PHP SELF']?>"> <table border="0" cellpadding="0" cellspacing="5"> <tr> <td align="right"> <p>User ID</p> </td> <td> <input name="newid" type="text"
maxlength="100" size="25" /> <font color="orangered" size="+1"><tt><b>*</b></tt></font> </td> </tr> <tr> <td align="right"> <p>Full Name</p> </td> <td> <input name="newname" type="text" maxlength="100" size="25" /> <font color="orangered" size="+1"><tt><b>*</b></tt></font> </td> </tr> <tr> <td align="right"> <p>E-Mail Address</p> </td> <td> <input name="newemail" type="text" maxlength="100" size="25" /> <font color="orangered" size="+1"><tt><b>*</b></tt></font> </td> </tr> <tr valign="top"> <td align="right"> <p>Other Notes</p> </td>
<td> <textarea wrap="soft" name="newnotes" rows="5" cols="30"></textarea> </td> </tr> <tr> <td align="right" colspan="2"> <hr noshade="noshade" /> <input type="reset" value="Reset Form" /> <input type="submit" name="submitok" value=" OK " /> </td> </tr> </table> </form> </body> </html> There is actually one piece of PHP code already embedded in this form: <form method="post" action="<?=$ SERVER['PHP SELF']?>">. Notice the action attribute. In a familiar design pattern, which I have called multipurpose pages in previous articles, we are causing the form to be submitted to the same page containing the form code. By watching for the PHP variable $ POST['submitok'], which will be created by the submit button in this form
(notice name="submitok" in the tag), our script will be able to handle the form submissions as well as the display of the form itself. -2- We're also using a relatively new form of syntax to print out the $ SERVER['PHP SELF'] variable. In case you are unfamiliar with this syntax, allow me to clarify that <?=expression?> is functionally identical to <?php echo expression; ?>. Thus, in this case, we could have instead written the following: <form method="post" action="<?php echo $ SERVER['PHP SELF']; ?>"> Now that we've got the code for our form, we can move on to writing the complete signup script. The Signup Script If you're used to writing database-driven Web sites, then the signup script should seem pretty straightforward. First we need to write a couple of snippets of code that will perform common functions like connecting to the database that will store the usernames and passwords for the
site. These snippets will take the form of PHP functions stored in include files. We'll use one include file to house database-related functions (dbphp), and another to store more general functions (common.php) First, here's the code for db.php: <?php // db.php $dbhost = "localhost"; $dbuser = "user"; $dbpass = "password"; function dbConnect($db="") { global $dbhost, $dbuser, $dbpass; $dbcnx = @mysql connect($dbhost, $dbuser, $dbpass) or die("The site database appears to be down."); if ($db!="" and !@mysql select db($db)) die("The site database is unavailable."); return $dbcnx; } ?> The dbConnect function defined here can be called with or without an argument, because we've assigned a default value ("") to the $db argument in the function declaration. The function begins by connecting to the MySQL server using the $dbhost, $dbuser, and $dbpass variables at the top of the file
(you'll need to set these to appropriate values for your server), and then if a database name was given it selects that database. Assuming everything proceeds without error, the reference to the database connection is returned. The second include file, common.php, also contains a single function: <?php // common.php function error($msg) { ?> <html> <head> <script language="JavaScript"> <!-alert("<?=$msg?>"); history.back(); //--> </script> </head> <body> </body> </html> <? -3- exit; } ?> We'll use this error function to tell the user when he or she has done something wrong. It takes an error message as an argument, and then displays it in a JavaScript pop-up message before backing up to the previous page. This function ends the script that calls it with the exit command, so it's suitable for use when something goes wrong in one of your scripts. With these boring details out
of the way, you can now turn your attention to the signup script (signup.php) The script begins by loading the two include files we just wrote: <?php // signup.php include 'common.php'; include 'db.php'; This assumes that the files in question are available in the include path. Consider, for example, the following include path, which I use in my php.ini file: include path = ".;c:php4pear;d:wwwphpinclude" On a Unix server, it might look like this: include path = ".:/usr/local/php/lib/php:/home/kyank/phpinclude" In either case, you can choose to put your include files in the same directory as the file(s) that use them, or place them in a directory listed in the include path. The latter choice is a safer for files containing sensitive information like passwords, because if the PHP support in your Web server ever fails, the information in PHP files not stored below your server's Web root directory will not be exposed to prying eyes. Next,
the script checks for the presence of a $ POST['submitok'] variable, which would indicate that the signup form had been submitted. If the variable is not found, the script displays the form from the previous section for the user to fill in: if (!isset($ POST['submitok'])): // Display the user signup form ?> <!DOCTYPE html PUBLIC "-//W3C//DTD XHTML 1.0 Transitional//EN" "http://www.w3org/TR/xhtml1/DTD/xhtml1-transitionaldtd"> <html xmlns="http://www.w3org/1999/xhtml"> <head> <title>New User Registration</title> . The rest of the script is responsible for processing the form submission by adding the new user to the database, so let's pause for a moment and look at the design of the database table. Here's the MySQL command to create the table: mysql> CREATE TABLE user ( -> ID INT PRIMARY KEY AUTO INCREMENT, -> userid VARCHAR(100) UNIQUE NOT NULL, -> password CHAR(16) NOT NULL, ->
fullname VARCHAR(100) NOT NULL, -> email VARCHAR(100) NOT NULL, -> notes TEXT); As you can see, the table is fairly simple. In your application, you might have need of additional columns or even multiple tables, but for the purposes of this example this simple design will suffice. -4- So, returning to the script, when the $submit variable is detected, the script needs to prepare to insert the new entry into the database using the dbConnect function from db.php: <?php else: // Process signup submission dbConnect('sessions'); Note that I'm assuming the database containing the user table is named sessions. Be sure to change this if you're using a different database name. The next thing the script needs to do is check that the required fields in the form are filled in. If any of the corresponding variables are found to be empty strings, the script calls the error function from common.php to tell the user what went wrong and return to the form: if ($
POST['newid']=='' or $ POST['newname']=='' or $ POST['newemail']=='') { error('One or more required fields were left blank.\n' 'Please fill them in and try again.'); } Next, the script needs to determine whether the ID selected by the user is already present in the database, in which case the user will have to select a new ID. The handling of this query is somewhat unusual, in that we fetch a single value (the count of entries with matching user ID's) that will practically be either 0 or 1. Since there's just the one value, there's no need to loop through the result set. Instead, we use the mysql result function to fetch the value of the first column (index 0) of the first row (index 0): // Check for existing user with the new id $sql = "SELECT COUNT(*) FROM user WHERE userid = '$ POST[newid]'"; $result = mysql query($sql); if (!$result) { error('A database error
occurred in processing your '. 'submission.\nIf this error persists, please ' 'contact you@example.com'); } if (@mysql result($result,0,0)>0) { error('A user already exists with your chosen userid.\n' 'Please try another.'); } Don't forget to change the email address in the error message! With all the checking done, there remains only one task to be completed before the entry is added to the database. You may have noticed that the signup form didn't contain a field for the user to enter a password This was done deliberately. Instead of letting the user set a password upfront, a common trick that many sites use is to automatically generate an initial password and send it to the email address entered by the user. This is an effective method for checking that a valid address is entered; however, in a practical system you might end up with a lot of "bad" entries in the database. To correct this, one solution would be to
add two columns to the user database. The first would hold a timestamp for when the user was created The second would be a Boolean (true/false) value that would be initially set to false and would be set true the first time the user logged in. You could then write a script that would be run once a week as an automated task (using cron, for instance) to delete any entries for users that had registered over a week ago and had not yet logged in. In practice, these would be entries with invalid email addresses, whose passwords had never reached their users. The task that the script must perform next, then, is to generate a password for the user. While there are many methods to generate semi-random text strings for use as passwords, the following one-liner has served me well: $newpass = substr(md5(time()),0,6); -5- This works by taking the current time and performing an MD5 hash on it. This is basically a one-way cryptographic encoding into a text string, which is then chopped to 6
characters using the substr function. The result is a 6-character password that would be fairly difficult to guess. Finally, the script performs the database insert: $sql = "INSERT INTO user SET userid = '$ POST[newid]', password = PASSWORD('$newpass'), fullname = '$ POST[newname]', email = '$ POST[newemail]', notes = '$ POST[newnotes]'"; if (!mysql query($sql)) error('A database error occurred in processing your '. 'submission.\nIf this error persists, please ' 'contact you@example.com'); Once again, change the email address in the message to your own. The only point worthy of mention on the above code is the use of MySQL's PASSWORD function to encode the password in the database. You could, of course, store the passwords in plain text, but users of a system often feel more comfortable when the administrator cannot read their password. Although this doesn't add much in the way of
security, since presumably the administrator has full access to the database, users generally appreciate any privacy they can get. Now that the user has been registered in the database, the script needs to send an email message indicating the password that has been assigned to the user. This is easily done using PHP's email function: // Email the new password to the person. $message = "G'Day! Your personal account for the Project Web Site has been created! To log in, proceed to the following address: http://www.examplecom/ Your personal login ID and password are as follows: userid: $ POST[newid] password: $newpass You aren't stuck with this password! Your can change it at any time after you have logged in. If you have any problems, feel free to contact me at <you@example.com> -Your Name Your Site Webmaster "; mail($ POST['newemail'],"Your Password for Your Website", $message, "From:Your Name <you@example.com>");
Customize the message for your own purposes, and ensure that you slot in your own email address and your site's URL and name where appropriate. Finally, the script outputs the HTML for the page that the user will see upon successful registration: ?> <!DOCTYPE html PUBLIC "-//W3C//DTD XHTML 1.0 Transitional//EN" -6- "http://www.w3org/TR/xhtml1/DTD/xhtml1-transitionaldtd"> <html xmlns="http://www.w3org/1999/xhtml"> <head> <title> Registration Complete </title> <meta http-equiv="Content-Type" content="text/html; charset=iso-8859-1" /> </head> <body> <p><strong>User registration successful!</strong></p> <p>Your userid and password have been emailed to <strong><?=$ POST[newemail]?></strong>, the email address you just provided in your registration form. To log in, click <a href="index.php">here</a> to return to
the login page, and enter your new personal userid and password.</p> </body> </html> <?php endif; ?> Notice that this message directs the user to index.php as the "login page" for the site This assumes that your entire site will require registration for access, with the sole exception of the signup page itself. If you only intend to protect a particular area of your site, you should probably change this message to direct the user to the password-protected area of the site. You don't need to direct them to a particular login page; as we shall see in Part 2 of this article, any protected page of the site will prompt for access if the user is not already logged in. With the signup process ready to roll, we have laid the groundwork for a Website that requires users to register for access. Users can now create an account for themselves and have it instantly available to them, with no intervention required on the part of the site administrator. By
automatically generating an initial password for each new user and emailing it to them at the address they provide during registration, you can be certain that the email address provided by each user is valid. This also opens the door to a handy "email me my forgotten password" feature if you decide it is appropriate. Part Two: Controlling Access The next step is to build the site itself, and while prompting the user for a username and password and matching the entered values to an entry in the MySQL database are fairly straightforward processes implementation-wise, the major challenge to be faced in the second half of this article is doing it in such a way that the user need only log in once during any particular visit to the site. As I shall show, the built-in support for PHP sessions are an excellent means to this end. PHP Sessions If you've never used the support for sessions that was added to PHP in version 4.0, you might be a little fuzzy on the question of what
sessions actually are. Despite the complicated-sounding name, sessions are really just an easy method for creating variables that stick around for the duration of a user's stay at your site. Unless configured otherwise, a PHP session works by automatically setting a cookie in the user's browser containing a session ID, which is a long string of letters and numbers that serves to uniquely identify that user on your site for the duration of the visit. The browser then sends that cookie along with every request for a page from your site so that PHP can use it to identify which of potentially many sessions-in-progress the request belongs to. Using a set of temporary files stored on the Web server, PHP keeps track of the variables that have been registered in each session and their values. Before you can go ahead and use the spiffy session-management features in PHP, you need to ensure that the relevant section of your php.ini file has been set up properly If you're using a
server belonging to your Web host, it's probably safe to assume this has been done for you. Otherwise, open your phpini file in a text editor and look for the section marked [Session]. Beneath it, you'll find twenty-some options beginning with the word session. Most of them are just fine if left as-is, but here are a few crucial ones you'll want to check: -7- session.save handler session.save path session.use cookies = files = "C:WINDOWSTEMP" = 1 session.save path tells PHP where to create the temporary files used to track sessions It must be set to a directory that exists on the system, or you'll get ugly error messages when you try to create a session on one of your pages. Under Unix, /tmp is a popular choice In Windows, you could use C:WINDOWSTEMP, or some other directory if you prefer (I use D:PHPSESSIONS). With these adjustments made, restart your Web server software to allow changes to take effect. You're now ready to start working with
PHP sessions. Before jumping into the access control script, let's quickly look at the most common session management functions in PHP. To tell PHP to look for a session ID, or to start a new session if none is found, you simply call session start. If an existing session ID is found when this function is called, PHP restores the variables belonging to the session. session start(); To tell PHP that you want a particular variable to be stored in the current session so that it is available to other scripts run in the same session, simply set a variable in the $ SESSION array. For example, the following will store the variable called $ SESSION['pwd'] in the current session: $ SESSION['pwd'] = value; To remove a variable from the current session, you just use PHP's unset function: unset($ SESSION['pwd']); Finally, should you want to end the current session, deleting all registered variables in the process, you can empty the $ SESSION array and then
use session destroy: $ SESSION = array(); session destroy(); For more detailed information on these and the other session-management functions in PHP, see the relevant section of the PHP Manual: Session handling functions. The Access Control Script For each page that you want to protect with this access control scheme (so that only registered users may view it), your script must follow the procedure described by the flowchart below. -8- The first time that a protected page is requested, the user will not have entered his or her login details yet. The script detects this and prompts the user for a username and password with a login form instead of displaying the requested page. When that form is submitted, the page is reloaded, this time with a username and password specified. The script sees that the login details have been specified, and registers them as session variables so that they remain available for the rest of the user's visit. Finally, the script checks the
database to make sure the username/password combination is valid. If it is, the page requested is displayed If not, an "access denied" message is displayed with a link inviting the user to try logging in again. Since this procedure will be identical for all protected pages, it makes sense to implement it as a common include file. This will allow you to protect a page by simply adding the following line at the top of the file: <?php include 'accesscontrol.php'; ?> With the objective now clear, I'll walk you through the code for accesscontrol.php Begin by including your two handy include files: <?php // accesscontrol.php include once 'common.php'; include once 'db.php'; I use include once here instead of include just in case the main file also uses these include files. If common.php were included twice, for example, PHP would issue a warning that the error function had been declared twice. Next, I call session start to either begin
a new session (if this is the first page in the user's visit), or load the variables belonging to the user's current session. session start(); At this point, the user's login details should be available whether they were just submitted from a login form (in the $ POST array) or stored in the user's session (in the $ SESSION array). So as a first order of business, the script needs to pull the login credentials out of either the $ POST or the $ SESSION array: $uid = isset($ POST['uid']) ? $ POST['uid'] : $ SESSION['uid']; $pwd = isset($ POST['pwd']) ? $ POST['pwd'] : $ SESSION['pwd']; These two lines use a handy (if confusing) syntax called the ternary operator, which takes this form: condition ? value if true : value if false If condition is true, the expression will equal value if true. If not, it will equal value if false So if you compare this to the first line above, you'll see that if there is
a 'uid' value in the $ POST array (isset($ POST['uid'])), $uid will be set to the value of $ POST['uid']. If not, it will be set to the value of $ SESSION['uid']. The same thing happens to create $pwd from the $ POST or $ SESSION array If you really aren't comfortable with the ternary operator, here's how you can do the same thing with if statements: if (isset($ POST['uid']) { $uid = $ POST['uid']; } else { $uid = $ SESSION['uid']; } if (isset($ POST['pwd']) { $pwd = $ POST['pwd']; } else { $pwd = $ SESSION['pwd']; } -9- As you can see, the ternary operator can save a lot of typing if you can get your head around it! Now, at this stage, the only case in which the user's ID and password would not be available is if they had not been entered during this visit to the site. if(!isset($uid)) { ?> <!DOCTYPE html PUBLIC "-//W3C/DTD XHTML 1.0 Transitional//EN"
"http://www.w3org/TR/xhtml1/DTD/xhtml1-transitionaldtd"> <html xmlns="http://www.w3org/1999/xhtml"> <head> <title> Please Log In for Access </title> <meta http-equiv="Content-Type" content="text/html; charset=iso-8859-1" /> </head> <body> <h1> Login Required </h1> <p>You must log in to access this area of the site. If you are not a registered user, <a href="signup.php">click here</a> to sign up for instant access!</p> <p><form method="post" action="<?=$ SERVER['PHP SELF']?>"> User ID: <input type="text" name="uid" size="8" /><br /> Password: <input type="password" name="pwd" SIZE="8" /><br /> <input type="submit" value="Log in" /> </form></p> </body> </html> <?php exit; }
When the login form above is submitted, the page will be reloaded, this time with the $uid and $pwd variables set to the user's ID and password. The next step according to the flowchart above is to register these as session variables, ensuring that they are available to all other protected pages that the user views during this visit. Note that, at this point, the script still doesn't know whether or not the user ID and password that were entered are valid. I'll explain why the script does things in this order shortly $ SESSION['uid'] = $uid; $ SESSION['pwd'] = $pwd; To find out if the user ID and password are valid, the script searches the database for matching entries. In the SELECT query, I have encoded the $pwd variable using MySQL's PASSWORD function to match it against the stored password, which is also encoded. Be sure to use your own database name here -- I have called mine sessions -- and your own email address in the error message.
dbConnect("sessions"); $sql = "SELECT * FROM user WHERE userid = '$uid' AND password = PASSWORD('$pwd')"; $result = mysql query($sql); if (!$result) { error('A database error occurred while checking your '. 'login details.\nIfhis error persists, please ' 'contact you@example.com'); } If no matching rows are found in the database, then the login details provided are incorrect. The script checks for this using the mysql num rows function, and displays a message denying access to the site, and inviting the user to try logging in again. To make this possible, the script also unregisters the two session variables ($ SESSION['uid'] and $ SESSION['pwd']) so that the next time the script is run it will display the login form. Since the variables were registered earlier in the script before checking their validity, the script doesn't need to check if they're registered before attempting to
unregister them. - 10 - if (mysql num rows($result) == 0) { unset($ SESSION['uid']); unset($ SESSION['pwd']); ?> <!DOCTYPE html PUBLIC "-//W3C//DTD XHTML 1.0 Transitional//EN" "http://www.w3org/TR/xhtml1/DTD/xhtml1-transitionaldtd"> <html xmlns="http://www.w3org/1999/xhtml"> <head> <title> Access Denied </title> <meta http-equiv="Content-Type" content="text/html; charset=iso-8859-1" /> </head> <body> <h1> Access Denied </h1> <p>Your user ID or password is incorrect, or you are not a registered user on this site. To try logging in again, click <a href="<?=$ SERVER['PHP SELF']?>">here</a>. To register for instant access, click <a href="signup.php">here</a></p> </body> </html> <?php exit; } Now that the login details have been stored as session variables and checked
for validity, the script can safely grant access to the requested page. The last thing I do before ending accesscontrolphp and handing control back to the protected page is to grab the user's full name, which is available from the MySQL result set generated earlier on. This doesn't need to be registered as a session variable, since it will be retrieved again by each protected page using the 'uid' and 'pwd' values stored in the session. $username = mysql result($result,0,'fullname'); ?> That completes accesscontrol.php, and with it the access control system! To reiterate, any page can now be restricted to members-only access simply by including accesscontrol.php at the top of the script Here's a very simple example that makes use of the $username variable to display the user's name: <?php include 'accesscontrol.php'; ?> <!DOCTYPE html PUBLIC "-//W3C//DTD XHTML 1.0 Transitional//EN"
"http://www.w3org/TR/xhtml1/DTD/xhtml1-transitionaldtd"> <html xmlns="http://www.w3org/1999/xhtml"> <head> <title> Members-Only Page </title> <meta http-equiv="Content-Type" content="text/html; charset=iso-8859-1" /> </head> <body> <p>Welcome, <?=$username?>! You have entered a members-only area of the site. Don't you feel special?</p> </body> </html> - 11 -