Comments
No comments yet. You can be the first!
Most popular documents in this category


Content extract
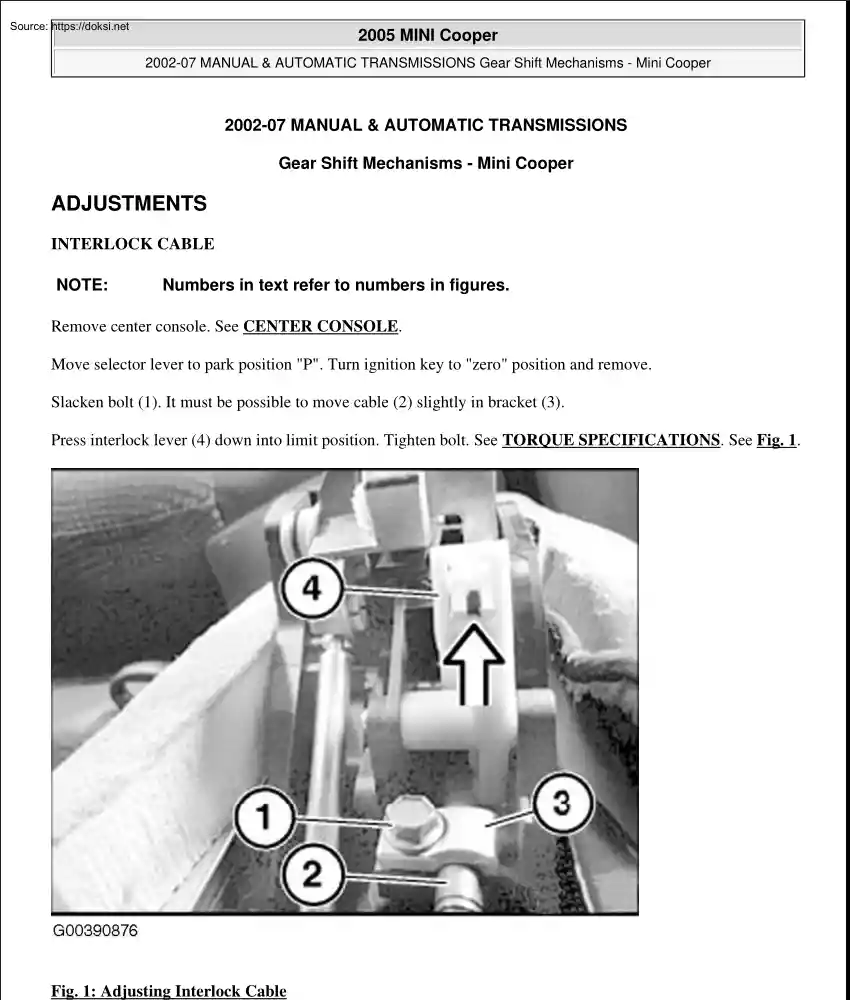
2005 MINI Cooper 2002-07 MANUAL & AUTOMATIC TRANSMISSIONS Gear Shift Mechanisms - Mini Cooper 2002-07 MANUAL & AUTOMATIC TRANSMISSIONS Gear Shift Mechanisms - Mini Cooper ADJUSTMENTS INTERLOCK CABLE NOTE: Numbers in text refer to numbers in figures. Remove center console. See CENTER CONSOLE Move selector lever to park position "P". Turn ignition key to "zero" position and remove Slacken bolt (1). It must be possible to move cable (2) slightly in bracket (3) Press interlock lever (4) down into limit position. Tighten bolt See TORQUE SPECIFICATIONS See Fig 1 Fig. 1: Adjusting Interlock Cable Microsoft Tuesday, February 16, 2010 10:38:26 10:38:21 AM Page 1 2005 Mitchell Repair Information Company, LLC. 2005 MINI Cooper 2002-07 MANUAL & AUTOMATIC TRANSMISSIONS Gear Shift Mechanisms - Mini Cooper Courtesy of BMW OF NORTH AMERICA, INC. To check interlock adjustment: Ignition key removed or in "0" position. Selector lever must not move
from "P" position Turn ignition key to "ignition" position. It must be possible to select all selector lever positions Select all selector lever positions except "P". In none of these positions should it be possible to turn ignition key back to the "0" position and remove. Move selector lever to position "P". It must be possible to turn the ignition key back and remove it If necessary, readjust interlock cable. REMOVAL & INSTALLATION SHIFT CABLE ASSEMBLY NOTE: Numbers in text refer to numbers in figures. Removal & Installation Detach shift cable assembly at shift lever bracket. On Cooper, remove battery box. Release clips (1) for shift cable at housing. Detach shift cable from ball joint (2) Pull shift cable (3) out of housing (4). Remove housing and cable from vehicle See Fig 2 Microsoft Tuesday, February 16, 2010 10:38:21 AM Page 2 2005 Mitchell Repair Information Company, LLC. 2005 MINI Cooper
2002-07 MANUAL & AUTOMATIC TRANSMISSIONS Gear Shift Mechanisms - Mini Cooper Fig. 2: Removing Shift Cable Assembly (Cooper) Courtesy of BMW OF NORTH AMERICA, INC. On Cooper S, remove intake filter housing. See INTAKE FILTER HOUSING (COOPER S) Use special tool 23 4 010 to detach shift cable assembly (1) at ball joint. Detach shift cable at stop/bracket (2) and remove See Fig. 3 Microsoft Tuesday, February 16, 2010 10:38:21 AM Page 3 2005 Mitchell Repair Information Company, LLC. 2005 MINI Cooper 2002-07 MANUAL & AUTOMATIC TRANSMISSIONS Gear Shift Mechanisms - Mini Cooper Fig. 3: Removing Shift Cable Assembly (Cooper S) Courtesy of BMW OF NORTH AMERICA, INC. DUST COVER FOR SHIFT LEVER NOTE: Numbers in text refer to numbers in figures. Removal & Installation Remove gear shift knob or handle. See SHIFT LEVER KNOB or SHIFT LEVER HANDLE Pull dust cover surround (1) upwards to release six securing clips. Remove gaiter Dust cover surround has locating pins that ensure
correct fit into the center console. See Fig 4 Microsoft Tuesday, February 16, 2010 10:38:21 AM Page 4 2005 Mitchell Repair Information Company, LLC. 2005 MINI Cooper 2002-07 MANUAL & AUTOMATIC TRANSMISSIONS Gear Shift Mechanisms - Mini Cooper Fig. 4: Pulling Dust Cover Surround Upward Courtesy of BMW OF NORTH AMERICA, INC. Release clips (1) and remove dust cover (2) from dust cover surround (3). See Fig 5 Microsoft Tuesday, February 16, 2010 10:38:21 AM Page 5 2005 Mitchell Repair Information Company, LLC. 2005 MINI Cooper 2002-07 MANUAL & AUTOMATIC TRANSMISSIONS Gear Shift Mechanisms - Mini Cooper Fig. 5: Removing Dust Cover Courtesy of BMW OF NORTH AMERICA, INC. SHIFT LEVER KNOB NOTE: Numbers in text refer to numbers in figures. Removal & Installation Do not twist knob during removal as this would cause the turning lock in the knob to shear off. Tug firmly to remove knob. To install, fit knob on shift lever, align and press on until knob is
noticeably into place See Fig 6. Microsoft Tuesday, February 16, 2010 10:38:21 AM Page 6 2005 Mitchell Repair Information Company, LLC. 2005 MINI Cooper 2002-07 MANUAL & AUTOMATIC TRANSMISSIONS Gear Shift Mechanisms - Mini Cooper Fig. 6: Removing Shift Lever Knob Courtesy of BMW OF NORTH AMERICA, INC. SHIFT LEVER HANDLE NOTE: Numbers in text refer to numbers in figures. Removal & Installation Do not twist handle during removal as this would cause the turning lock in the knob to shear off. Tug firmly to remove handle. To install, fit handle on shift lever, align and press on until noticeably into place See Fig 7 Microsoft Tuesday, February 16, 2010 10:38:21 AM Page 7 2005 Mitchell Repair Information Company, LLC. 2005 MINI Cooper 2002-07 MANUAL & AUTOMATIC TRANSMISSIONS Gear Shift Mechanisms - Mini Cooper Fig. 7: Removing Shift Lever Handle Courtesy of BMW OF NORTH AMERICA, INC. SHIFT LEVER BRACKET NOTE: Numbers in text refer to numbers in figures.
Removal & Installation Remove shift lever boot/gaiter. See GAITER (SELECTOR LEVER COVER) FOR SHIFT TOWER Remove rear exhaust system. See REAR SILENCER/EXHAUST SYSTEM Undo screws (1) and remove front heat shield. See Fig 8 Microsoft Tuesday, February 16, 2010 10:38:21 AM Page 8 2005 Mitchell Repair Information Company, LLC. 2005 MINI Cooper 2002-07 MANUAL & AUTOMATIC TRANSMISSIONS Gear Shift Mechanisms - Mini Cooper Fig. 8: Removing Front Heat Shield Courtesy of BMW OF NORTH AMERICA, INC. Undo screws (1) and remove center heat shield. See TORQUE SPECIFICATIONS See Fig 9 Release shift cables from retaining fixtures on vehicle floor. Microsoft Tuesday, February 16, 2010 10:38:22 AM Page 9 2005 Mitchell Repair Information Company, LLC. 2005 MINI Cooper 2002-07 MANUAL & AUTOMATIC TRANSMISSIONS Gear Shift Mechanisms - Mini Cooper Fig. 9: Removing Center Heat Shield Courtesy of BMW OF NORTH AMERICA, INC. Release screws (1). Detach shift lever housing (2) See
Fig 10 Microsoft Tuesday, February 16, 2010 10:38:22 AM Page 10 2005 Mitchell Repair Information Company, LLC. 2005 MINI Cooper 2002-07 MANUAL & AUTOMATIC TRANSMISSIONS Gear Shift Mechanisms - Mini Cooper Fig. 10: Detaching Shift Lever Housing Courtesy of BMW OF NORTH AMERICA, INC. Use care to not damage locking tabs on cover. Lift out locking tabs and release shift lever cover See Fig 11 Microsoft Tuesday, February 16, 2010 10:38:22 AM Page 11 2005 Mitchell Repair Information Company, LLC. 2005 MINI Cooper 2002-07 MANUAL & AUTOMATIC TRANSMISSIONS Gear Shift Mechanisms - Mini Cooper Fig. 11: Lifting Out Locking Tabs Courtesy of BMW OF NORTH AMERICA, INC. During installation, locking tabs (1) on cover (2) must not be damaged. Replace seals if defective See Fig 12 Microsoft Tuesday, February 16, 2010 10:38:22 AM Page 12 2005 Mitchell Repair Information Company, LLC. 2005 MINI Cooper 2002-07 MANUAL & AUTOMATIC TRANSMISSIONS Gear Shift Mechanisms -
Mini Cooper Fig. 12: Identifying Locking Tabs Courtesy of BMW OF NORTH AMERICA, INC. Use suitable pliers to detach shift cable assemblies (1). Remove clips (2) and pull shift cable assemblies out of housing. See Fig 13 Microsoft Tuesday, February 16, 2010 10:38:22 AM Page 13 2005 Mitchell Repair Information Company, LLC. 2005 MINI Cooper 2002-07 MANUAL & AUTOMATIC TRANSMISSIONS Gear Shift Mechanisms - Mini Cooper Fig. 13: Removing Clips & Pulling Shift Cable Assemblies Out Of Housing Courtesy of BMW OF NORTH AMERICA, INC. SHIFT TOWER NOTE: Numbers in text refer to numbers in figures. Removal & Installation Move selector lever to "P" position. Remove center console See CENTER CONSOLE Remove cable/parking lever. See DISC - MINI article Detach plug connector (1) of position switch. See Fig 14 Microsoft Tuesday, February 16, 2010 10:38:22 AM Page 14 2005 Mitchell Repair Information Company, LLC. 2005 MINI Cooper 2002-07 MANUAL & AUTOMATIC
TRANSMISSIONS Gear Shift Mechanisms - Mini Cooper Fig. 14: Detaching Plug Connector Of Position Switch Courtesy of BMW OF NORTH AMERICA, INC. Remove final muffler. See REAR SILENCER/EXHAUST SYSTEM Remove retaining elements (1) of front heat shield. It is not necessary to remove the heat shield See Fig 15 Microsoft Tuesday, February 16, 2010 10:38:22 AM Page 15 2005 Mitchell Repair Information Company, LLC. 2005 MINI Cooper 2002-07 MANUAL & AUTOMATIC TRANSMISSIONS Gear Shift Mechanisms - Mini Cooper Fig. 15: Removing Front Heat Shield Courtesy of BMW OF NORTH AMERICA, INC. Remove retaining elements (1) of middle heat shield. Detach shift cable from mounting on floor See Fig 16 Microsoft Tuesday, February 16, 2010 10:38:22 AM Page 16 2005 Mitchell Repair Information Company, LLC. 2005 MINI Cooper 2002-07 MANUAL & AUTOMATIC TRANSMISSIONS Gear Shift Mechanisms - Mini Cooper Fig. 16: Removing Retaining Elements Of Middle Heat Shield Courtesy of BMW OF NORTH
AMERICA, INC. Remove retaining screws (1) of gear shift housing. See TORQUE SPECIFICATIONS See Fig 17 Microsoft Tuesday, February 16, 2010 10:38:22 AM Page 17 2005 Mitchell Repair Information Company, LLC. 2005 MINI Cooper 2002-07 MANUAL & AUTOMATIC TRANSMISSIONS Gear Shift Mechanisms - Mini Cooper Fig. 17: Removing Retaining Screws Of Gear Shift Housing Courtesy of BMW OF NORTH AMERICA, INC. Undo fastening nut (1) of cable assembly. Press retaining clip (2) together and remove cable from fixture (3) Remove cable (4). See Fig 18 Microsoft Tuesday, February 16, 2010 10:38:22 AM Page 18 2005 Mitchell Repair Information Company, LLC. 2005 MINI Cooper 2002-07 MANUAL & AUTOMATIC TRANSMISSIONS Gear Shift Mechanisms - Mini Cooper Fig. 18: Removing Cable Courtesy of BMW OF NORTH AMERICA, INC. Release retaining clips of housing (1) on floor. See Fig 19 Secure selector lever Remove housing Microsoft Tuesday, February 16, 2010 10:38:22 AM Page 19 2005 Mitchell Repair
Information Company, LLC. 2005 MINI Cooper 2002-07 MANUAL & AUTOMATIC TRANSMISSIONS Gear Shift Mechanisms - Mini Cooper Fig. 19: Releasing Retaining Clips Of Housing On Floor Courtesy of BMW OF NORTH AMERICA, INC. Remove retaining clip of shift cable and disconnect shift cable on selector lever. Note that if shift cable is removed from the selector lever, the locking sleeve of the ball joint must be detached with the shift cable. See Fig. 20 Microsoft Tuesday, February 16, 2010 10:38:22 AM Page 20 2005 Mitchell Repair Information Company, LLC. 2005 MINI Cooper 2002-07 MANUAL & AUTOMATIC TRANSMISSIONS Gear Shift Mechanisms - Mini Cooper Fig. 20: Identifying Retaining Clip, Selector Lever, Locking Sleeve & Retaining Lug Courtesy of BMW OF NORTH AMERICA, INC. If necessary, install new shift cable. Resecure housing on body Make sure housing seal is correctly seated Move selector lever (1) to "P" position. See Fig 21 Resecure shift cable in fixture on
transmission and install in cable mounting. Reinsert cable in fixture on floor Microsoft Tuesday, February 16, 2010 10:38:22 AM Page 21 2005 Mitchell Repair Information Company, LLC. 2005 MINI Cooper 2002-07 MANUAL & AUTOMATIC TRANSMISSIONS Gear Shift Mechanisms - Mini Cooper Fig. 21: Moving Selector Lever To "P" Position Courtesy of BMW OF NORTH AMERICA, INC. Make sure selector lever (1) is in "P" position. Tighten down cable fixture (2) See Fig 22 Reinstall cable/parking gear. Install center console Microsoft Tuesday, February 16, 2010 10:38:22 AM Page 22 2005 Mitchell Repair Information Company, LLC. 2005 MINI Cooper 2002-07 MANUAL & AUTOMATIC TRANSMISSIONS Gear Shift Mechanisms - Mini Cooper Fig. 22: Tightening Down Cable Fixture Courtesy of BMW OF NORTH AMERICA, INC. GAITER (SELECTOR LEVER COVER) FOR SHIFT TOWER NOTE: Numbers in text refer to numbers in figures. Removal & Installation Remove shift knob/handle. See SHIFT LEVER
KNOB or SHIFT LEVER HANDLE Pull off chrome ring with gaiter. See Fig 23 Microsoft Tuesday, February 16, 2010 10:38:22 AM Page 23 2005 Mitchell Repair Information Company, LLC. 2005 MINI Cooper 2002-07 MANUAL & AUTOMATIC TRANSMISSIONS Gear Shift Mechanisms - Mini Cooper Fig. 23: Pulling Off Chrome Ring With Gaiter Courtesy of BMW OF NORTH AMERICA, INC. Disconnect connector (1). See Fig 24 Microsoft Tuesday, February 16, 2010 10:38:22 AM Page 24 2005 Mitchell Repair Information Company, LLC. 2005 MINI Cooper 2002-07 MANUAL & AUTOMATIC TRANSMISSIONS Gear Shift Mechanisms - Mini Cooper Fig. 24: Disconnecting Connector Courtesy of BMW OF NORTH AMERICA, INC. Unlock detent lugs (1) of mounting ring. Remove chrome ring (2) See Fig 25 Microsoft Tuesday, February 16, 2010 10:38:22 AM Page 25 2005 Mitchell Repair Information Company, LLC. 2005 MINI Cooper 2002-07 MANUAL & AUTOMATIC TRANSMISSIONS Gear Shift Mechanisms - Mini Cooper Fig. 25: Unlocking Detent
Lugs & Removing Chrome Ring Courtesy of BMW OF NORTH AMERICA, INC. Release screws (1). See Fig 26 Convert shift display Microsoft Tuesday, February 16, 2010 10:38:22 AM Page 26 2005 Mitchell Repair Information Company, LLC. 2005 MINI Cooper 2002-07 MANUAL & AUTOMATIC TRANSMISSIONS Gear Shift Mechanisms - Mini Cooper Fig. 26: Releasing Screws Courtesy of BMW OF NORTH AMERICA, INC. INTAKE FILTER HOUSING (COOPER S) NOTE: Numbers in text refer to numbers in figures. Removal & Installation Switch off ignition. Remove battery connection point (1) and lay to one side Unlock plug on DME control unit and disconnect. Release screws on intake filter housing. Release clamp (2) and remove hose from intake filter housing See TORQUE SPECIFICATIONS. See Fig 27 During installation, note installation position of wiring harness mounting. Microsoft Tuesday, February 16, 2010 10:38:22 AM Page 27 2005 Mitchell Repair Information Company, LLC. 2005 MINI Cooper 2002-07 MANUAL
& AUTOMATIC TRANSMISSIONS Gear Shift Mechanisms - Mini Cooper Fig. 27: Removing Hose From Intake Filter Housing Courtesy of BMW OF NORTH AMERICA, INC. Remove inlet pipe (1) from intake filter housing. See Fig 28 Remove intake filter housing Microsoft Tuesday, February 16, 2010 10:38:22 AM Page 28 2005 Mitchell Repair Information Company, LLC. 2005 MINI Cooper 2002-07 MANUAL & AUTOMATIC TRANSMISSIONS Gear Shift Mechanisms - Mini Cooper Fig. 28: Removing Inlet Pipe From Intake Filter Housing Courtesy of BMW OF NORTH AMERICA, INC. During installation, note installation position of rubber elements. See Fig 29 Microsoft Tuesday, February 16, 2010 10:38:22 AM Page 29 2005 Mitchell Repair Information Company, LLC. 2005 MINI Cooper 2002-07 MANUAL & AUTOMATIC TRANSMISSIONS Gear Shift Mechanisms - Mini Cooper Fig. 29: Installation Position Of Rubber Elements Courtesy of BMW OF NORTH AMERICA, INC. CENTER CONSOLE NOTE: Numbers in text refer to numbers in figures.
Removal & Installation Front center console and cover trims for front center console on instrument panel must be simultaneously removed and installed. Remove shift lever knob/handle See SHIFT LEVER KNOB or SHIFT LEVER HANDLE. Remove dust guard To remove the ashtray (1) (depending on equipment specification), open the ashtray lid and lift out the ashtray housing. Remove screws (2) in drink holders See Fig 30 Microsoft Tuesday, February 16, 2010 10:38:22 AM Page 30 2005 Mitchell Repair Information Company, LLC. 2005 MINI Cooper 2002-07 MANUAL & AUTOMATIC TRANSMISSIONS Gear Shift Mechanisms - Mini Cooper Fig. 30: Removing Ashtray & Drink Holders Courtesy of BMW OF NORTH AMERICA, INC. Snap switch cluster out of center console. Detach plug connector (1) from switch cluster Release screws (2) at back end of console. See Fig 31 Microsoft Tuesday, February 16, 2010 10:38:22 AM Page 31 2005 Mitchell Repair Information Company, LLC. 2005 MINI Cooper 2002-07 MANUAL
& AUTOMATIC TRANSMISSIONS Gear Shift Mechanisms - Mini Cooper Fig. 31: Detaching Plug & Releasing Screws Courtesy of BMW OF NORTH AMERICA, INC. Release screws (1) securing both cover trims of the center console to the instrument panel. See TORQUE SPECIFICATIONS. See Fig 32 Microsoft Tuesday, February 16, 2010 10:38:22 AM Page 32 2005 Mitchell Repair Information Company, LLC. 2005 MINI Cooper 2002-07 MANUAL & AUTOMATIC TRANSMISSIONS Gear Shift Mechanisms - Mini Cooper Fig. 32: Releasing Screws Securing Cover Trims Courtesy of BMW OF NORTH AMERICA, INC. Detach front center console to facilitate removal of console and cover trim for instrument panel. Detach cover trims in direction (1) from instrument panel. Detach cover trims in direction (2) from center console Disconnect plug connector for socket/cigarette lighter. Remove console During installation, make sure foam blocks are correctly seated between center console and cover trims. See Fig 33 Microsoft Tuesday,
February 16, 2010 10:38:22 AM Page 33 2005 Mitchell Repair Information Company, LLC. 2005 MINI Cooper 2002-07 MANUAL & AUTOMATIC TRANSMISSIONS Gear Shift Mechanisms - Mini Cooper Fig. 33: Detaching Cover Trims Courtesy of BMW OF NORTH AMERICA, INC. TORQUE SPECIFICATIONS TORQUE SPECIFICATIONS Application Intake Housing To Body Intermediate Heat Shield Fixings Front Center Console To Instrument Panel Cover Trim Front Heat Shield Fixings Parking Lock Cable To Shift Console Shift Cable To Selector Lever Shift Housing To Body INCH Lbs. (Nm) 61-88 (7-10) 18-27 (2-3) 22 (2.5) 18-27 (2-3) 35-53 (4-6) 106 (12) 80 (9) Microsoft Tuesday, February 16, 2010 10:38:22 AM Page 34 2005 Mitchell Repair Information Company, LLC
 Just like you draw up a plan when you’re going to war, building a house, or even going on vacation, you need to draw up a plan for your business. This tutorial will help you to clearly see where you are and make it possible to understand where you’re going.