Comments
No comments yet. You can be the first!
Most popular documents in this category


Content extract
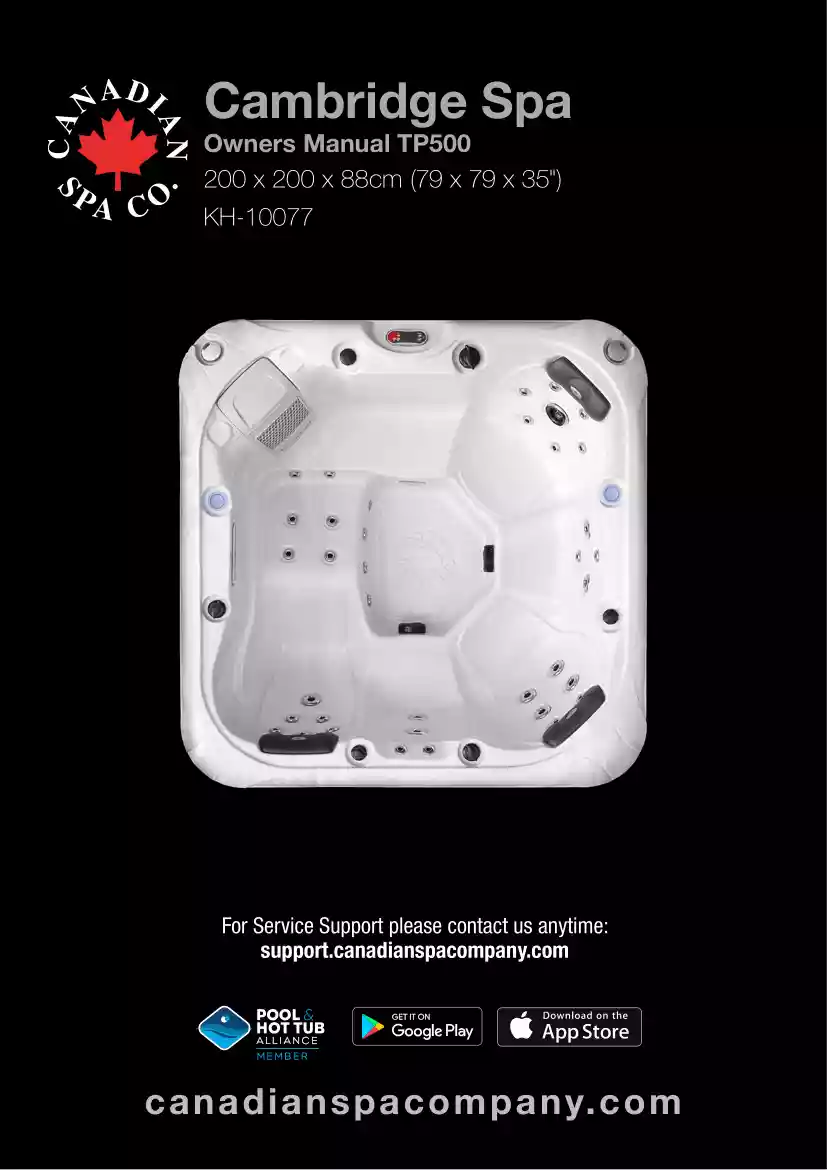
CAMBRIDGE TP500 Cambridge Spa Owners Manual TP500 200 x 200 x 88cm (79 x 79 x 35") KH-10077 For Service Support please contact us anytime: support.canadianspacompanycom canadians pa c om pa ny.c om CAMBRIDGE TP500 SAFETY INFORMATION - Europe (50Hz) IMPORTANT SAFETY INSTRUCTIONS When installing and using this electrical equipment be sure to follow these basic safety precautions: 1. WARNING: To reduce the risk of injury, do not permit children to use this product unless they are closely supervised at all times. 2. DANGER: Risk of accidental drowning Extreme caution must be exercised to prevent unauthorised access by children. To avoid accidents, ensure that children cannot use this spa unless they are supervised at all times. 3. DANGER: Risk of injury The suction fittings in this spa are sized to match specific water flow created by the pump. Should the need arise to replace the suction fitting or the pump, ensure that the flow rates are compatible. Never operate the spa
if suction fittings are broken or missing. Never replace a suction fitting with one rated less than the flow rate marked on the original suction fitting. 4. DANGER: Risk of Electrical Shock Install at least 5 feet (15m) from all metal surfaces. As an alternative, spa may be installed within 5 feet (15m) of metal surfaces if each metal surface is permanently connected (bonded) by a minimum ground wire. 5. DANGER: Risk of Electrical Shock Do not permit any electrical appliance such as a light, telephone, radio, television, etc. within 5 feet (15m) of a spa unless such appliances are installed and built-in by the manufacturer. 6. ELECTRICAL SUPPLY: The electrical supply for this product must include a suitably rated switch or circuit breaker to open all ungrounded supply conductors to comply with the national electrical standards. This disconnect must be readily accessible and visible to the spa occupant but installed at least 5 feet (1.5m), from the spa water 7.
WARNING: To reduce the risk of injury: a) The water in the spa should never exceed 40°C (104°F). Water temperature between 38°C (100°F) and 40°C (104°) is considered safe for a healthy adult. Lower water temperatures are recommended for young children and when the spa use exceeds 10 minutes. b) Since excessive water temperatures have a high potential for causing foetal damage during early months of pregnancy, pregnant women should limit spa water temperatures to 38°C (100°F) c) Before entering a spa, the user should measure the water temperature with an accurate thermometer since the tolerance of water temperature regulating devices varies. d) The use of alcohol, drugs, or medication before or during spa use may lead to unconsciousness with the possibility of drowning. e) Obese persons and persons with a history of heart disease, low or high blood pressure, circulatory system problems, or diabetes should consult a physician before using a spa. f)
Persons using medication should consult a physician before using a spa since some medication may induce drowsiness while other medication may affect heart rate, blood pressure, and circulation. AUDIO/VIDEO EQUIPMENT WARNINGS (Optional equipment based on model) CAUTION: Risk of Electrical Shock. Do not leave compartment door open 9. CAUTION: Risk of Electrical Shock Replace components only with identical components. 10. WARNING: Prevent Electrocution Do not connect any auxiliary components (for example cable, additional speakers, headphones, additional audio/video components, etc.) to system 11. CAUTION: Risk of Electrical Shock Do not service this product yourself as opening or removing audio covers may expose you to dangerous voltage or other risk of injury. Refer all servicing to qualified service personnel 12. CAUTION: Risk of Electrical Shock When the power supply connections or power supply cord(s) are damaged; if water is entering the audio / video compartment or
any electrical equipment compartment area; if the protective shields or barriers are showing signs of deterioration; or if there are signs of other potential damage to the unit, turn off the unit and refer the servicing to a qualified service personnel. 13. This unit should be subject to periodic routine maintenance (for example, once every 3 months) to make sure that the unit is operating properly. 14. CAUTION: Do not operate audio video controls while inside the spa 15. Installation of the spa for other than a residential dwelling will result in voiding the manufacturer’s warranty. 16. Do not bring any object into the spa that could damage the spa shell 17. Never insert any object into any opening 18. WARNING: Do not sit on the spa cover or place objects on it 19. Remove any water or debris that may collect on the spa cover 20. WARNING: Do not use the spa immediately after strenuous exercise 21. If you feel pain or dizziness at any time while using the spa, discontinue use
and contact a physician. 22. WARNING: To reduce risk of injury it is especially important that persons with pre-existing health conditions or problems such as obesity, heart disease, high or low blood pressure, circulatory problems, pregnancy or diabetes to consult their doctor before using the spa. 23. WARNING: Observe reasonable time limits when using the spa Long exposures at high temperatures can cause high body temperatures. Symptoms may include dizziness, nausea, fainting, drowsiness, and reduced awareness. These effects could possibly result in drowning. 24. WARNING: The spa jets produce a stream of water with relatively high pressure Prolonged exposure of localized area of the body may cause bruises to the skin. 25. IMPORTANT: The include warning sign must be posted where all users of the spa can see and read it. 26. WARNING: To avoid risk of drowning The Spa cover should be in place and properly latched when spa is not in use. 27. IMPORTANT: Read and
understand the warnings on the spa cover 28. Proper water chemistry is necessary to maintain the water and prevent possible damage to spa components. 8. WARNING REDUCE THE RISK OF ELECTROCUTION 1. Never place an electric appliance within 5 feet (15m) of spa REDUCE THE RISK OF CHILDREN DROWNING 1. Supervise children at all times 2. Attach and lock down spa cover after each use REDUCE THE RISK OF OVERHEATING 1. Check with a doctor before use if pregnant, diabetic, in poor health, or under medical care 2. Exit immediately if uncomfortable, dizzy, or sleepy Spa heat can cause hypothermia and unconsciousness 3. Spa heat in conjunction with alcohol, drugs, or medication can cause unconsciousness WHEN PREGNANT; soaking in hot water for long periods can harm your fetus. Measure water temperature before entering 1. Do not enter spa if water is hotter than 100ºF (38oC) 2. Do not stay in spa for longer than 10 minutes REGISTER YOUR WARRANTY ONLINE Please be sure to register your spa so we can
efficiently assist with any questions you may have. Until your spa has been registered, we will not have record of your ownership. To register your spa, visit: canadianspacompany.com/pages/warranty-registration SERIAL NUMBER: Purchase Date: (2) CAMBRIDGE TP500 Pre-Delivery Information Delivery Options Check your measurement guidelines for each spa. Optional crane service is available, please contact us for more information. Collection Buyer collects hot tub using own transport from one of our warehouses. Please arrange 48 hours prior to collection, Monday - Friday 10 am - 4pm. Cancellation Policy We require a 48-hour cancellation notice in writing or email prior to your scheduled delivery. If we are notified later, then a reasonable cancellation charge will be applied. Kerbside Delivery to outside the kerbside of house, customer to be present to sign for the delivery. Customer responsible to position the spa after it is removed from
truck. Service and Warranty Procedures Please read through your warranty carefully, as some items are deemed user serviceable and considered general maintenance items by the manufacturer. Back Garden Placement Delivery from warehouse and delivered to customer and moved into hot tub location. Customer to provide access for position Check measurements required for each spa. If you encounter any problems with your spa please contact our service desk on support.@canadianspacompanycom Our goal is to resolve any potential issue(s) as quickly as possible so that you can continue to enjoy your new spa. Back Garden Placement & Demonstration Delivery from warehouse to customer, moved into hot tub location then fully installed (including all accessories) and commissioned (No Electrics). Followed by a maintenance tutorial. Customer to provide access for position BACK GARDEN DELIVERY FORM Take your smart phone and tape measure outside with you and attach information directly from your
phone! At your convenience upload your information to our site and our experienced delivery team will organise your delivery and installation. Kerbside Drop Off Arrange a convenient time to deliver. Spa pack dimensions: 204(W) x 92(D) x 215(H)cm. Back Garden Placement & Demo Service (3 CAMBRIDGE TP500 Introduction to Cambridge hot tub 5 7 6 8 4 9 3 10 2 7 1 13 12 11 Hot tub features 1. FILTER BASKET: Assembly that holds the filter cartridge (Note: configurations may differ from model to model) 2. AROMATHERAPY: A small canister that holds scented beads and works in conjunction with the air control system to create an aromatic experience. 3. TOPSIDE CONSOLE: Button pad and temperature display panel located on the top of the spa into which various commands, control sequences and options for operating the spa can be input. User can set temperature, filtration cycle and heating mode through the console. 4. LARGE DIVERTER: These are located around the top of your
spa Increase or decrease the force of your jets by opening or closing the air control valves. 5. SPEAKERS x 2: Audio speaker system for playing music from an MP3 device 6. LED CUP HOLDERS x 2 : Placeholder for drinking receptacle 7. AIR VALVE: To adjust air flow into water stream 8. JET (VARIOUS): Device that ejects air and water, creating water movement in the spa Adjustable, directional, rotational and interchangeable 9. LED FOUNTAIN CONTROLLER: Controls fountain 10. LED FOUNTAIN JET: Located at the bottom of the spa, used to return water back into the filter and pump system 11. LED SPA PILLOW: To rest you head and neck (replaceable) 12. WATERFALL ON/OFF VALVE: Located on top rail of spa used to adjust the waterfall flow 13. WATERFALL & PERIMETER LIGHTING: To create a relaxing spa mood (4) CAMBRIDGE TP500 Hot tub equipment side Pump Ozone Generator Slice Valve Control pack Manifold CONTROL PACK: Unit that controls spa operations, containing electronic programming
boards, heater and all connections for Pump(s), Light(s), Ozone Generation Unit and Topside Console. Also referred to as ‘Spa Pack’ or ‘Controller’. Heater Slice valve Black out insulation DRAIN VALVE: Valve located on the outside of spa cabinet used to drain water from the spa. A garden hose can be attached to the drain valve. EQUIPMENT BAY: Located under the spa shell covered by access panels that houses the spa controller and equipment. HEATER: Electrical resistance device located in the Spa Controller containing the heating element and 2 temperature sensors. The flow through heater heats the spa’s water as it flows across the heating element. Heaters are available in several wattages SLICE VALVE: Two-position (open or closed) sliding valve, used to cut off water flow which allows for service to be performed on the spa equipment without the need to drain the spa. Slice valve operations: up for open, down (toward the valve body) for closed. MASSAGE PUMP:
Electro-mechanical device to move water, consisting of a wet end and a motor. OZONE GENERATOR: Device that generates ozone to aid in maintaining water quality. Ozone helps eliminate organic material such as body oils, dead skin cells and hair. (5) CAMBRIDGE TP500 Pre-Delivery Information X Before delivery check your spa height and width and add 5cm clearance on each side to ensure access. Check that the hot tub can clear a 90° turn Rotary Isolation Switch (pictured). Make sure you have a qualified electrican prepare the electrics. Allow 5 metre slack to connect to Spa. Ensure you have prepared a level concrete base or a properly fitted existing patio or decking with access to a drain. NOTE: A 10-15 cm concrete base is ideal preparation for a hot tub. Access: Canadian Spa hot tubs are usually delivered on a flat bed trailer, up to 5 metres long, 2.4 metres wide and 35 metres high. Please ensure that there is adequate access for such a vehicle to reach your property. When
off loading from our vehicle to the spa site, a minimum of 1100mm width is required, (some models vary) this also needs to be flat and a minimum clear vertical height of 9ft should be considered also. Decking around your spa: Ensure that you are aware of the above measurements. Always consider during your planning that any decking boards and supporting beams that you install allow access to the sides of your Spa. It is the customers’ responsibility to ensure that any decking is clear of these areas prior to any visit by our technicians (Allow 1 metre clearance around your hot tub and if you have decking ensure part of your decking can be removed in order to gain access for future repair or servicing). If you are unsure then please ask before ground construction and the delivery of your spa. Your spa must be sited on a solid, flat, level base which is the same size or larger than the spa. The base can be either a 10-15cm concrete slab or suitably strengthened timber decking or
existing patio area assuming it has suitable foundations of hardcore. Whatever base area is chosen, it must be of suitable load bearing capacity. Please ensure your base has suitable drainage. Electrical supply: If you are having your spa installed, it will be necessary to have a dedicated electrical circuit supply fitted. You will require up to 32 Amp (type C Breaker) supply, dependent on the length from the service point. Your spa must be protected via a RCD and suitable over current protection. A minimum of 5 metres of cable is required for connection into your spa from the Isolator. Electrical installation: Arrange for a licensed electrician run the required 230-volt power line to the spa installation site. This power line must be permanently connected (hard-wired) to the mains supply. Do not use extension cords or plug-in type connections. At the site where the spa is to be located leave 5 metres of cable and the appropriate cable gland. All electrical wiring to a spa must be
installed by a qualified, licensed electrician, and meet required electrical standards. Ensure part of your decking can be removed in order to gain access for future repair or servicing Water: The best means of filling your spa is with a garden hosepipe (use cold water not hot water). Please ensure that you have one readily available. If you are aware that your water pressure is poor, we should be advised prior to delivery. The design of our spas allows for easy drainage, again, using the hosepipe which conveniently fits onto the drain valve situated at the base of your spa. Ideally, you should empty the water to a nearby drain. You may wish to purchase a suitable submersible pump to speed up this process. Optional CraneService is available (6) CAMBRIDGE TP500 Filling up your Spa IMPORTANT: Before filling the spa, it is important to read and understand the water chemistry section of this manual. Do not proceed until the water chemistry section is understood and the source
water is tested. Verify that the spa is in the desired final location. Refer to the ‘Choose your location’ section - once filled, the spa cannot be moved without draining. Follow these filling instructions to avoid damage to the spa pumps: 1. Leave power to the spa off until spa is completely filled 2. Never leave an unfilled spa exposed to direct sunlight with out the Spa Cover installed. Resulting damage such as bubbles and wrinkles in the spa shell and fading of the jet faces is not covered by the manufacturer’s warranty. 3. Never operate spa pump without water because this could result in permanent pump and/or heater damage which is not covered by the manufacturer’s warranty. Draining your Spa/Using the drain valve 4. Remove all warning labels from spa shell 6. Remove the filter lid, basket and filter cartridge 1. Start by shutting off the electrical breaker connected to your spa. 7. Inspect all Jets (shipping may cause jets to become loose or
detached). Check to see that the black Drain Valve (located to the left or right of the front access panel) is closed. 2. Locate the drain valve at the side of the spa This valve has a straightforward locking mechanism that stops the water from flowing out while you attach a garden hose to the cap. IMPORTANT: Follow the next steps closely to prevent damage to the Spa Pump. First using the tab of the cap pull and twist until the pipe comes out. Filter Type: Glacier Microban Filter Set SKU: KA-10032 Then with the pipe out turn clockwise until the pipe extends further out. Water Fill level 3. With the valve fully extended, unscrew the cap from the middle of the valve. 4. Screw in the male end of the garden hose to the valve and run the hose to your drain location. 5. Once the water has stopped flowing out of the drain valve, use the wet/dry vacuum to suck out any remaining water from each jet head. 8. Insert garden hose or other clean water source directly into
filter housing. Push hose pipe into filter housing until it stops. Fill up to top of the honeycomb grill of the skimmer (see photo above). Secure hose placement and turn on water Filling the spa through the filter housing prevents an air lock from occurring in the spa pump, which is an air pocket preventing the flow of water through the pump. Permanent damage caused by running the pump with an air lock (or without water) is not covered by the manufacturer’s warranty. 9. Check for leaks! Although spas are fully checked at the factory, shipping and delivery might cause a leak. 6. Twist valve and push in to CLOSE Accessing your spa controls 10. Before power is applied familiarise yourself with the spa control operations. 11. Turn water off and remove hose 12. Reinstall filter cartridge, basket and filter lid 13. Add start-up Chemicals after power is turned on (7) CAMBRIDGE TP500 Installation: Electrical power requirements Power connections Single Phase (A) is the normal
wiring configuration for most household electrical installations (3 wires: live, neutral and earth). If however you have insufficient Amps you will need to use other connection (see below). 2 Single Phase connection (B) is used in circumstances where the power supply is limited and where you need more Amps. 3 Phase (C) is used in certain areas of Europe where 3 Phase power is available and the installation warrants it. NOTE: Canadian Spa Company requires that the electrical installation of your hot tub is carried out by a professionally licensed electrician and that all local electrical and building codes are adhered to. A.) Single Phase connection (Most common): CONNECTING HOT TUB TO RCD AND CONSUMER PANEL: Consumer panel • All hot tubs must be wired with the appropriate sized wiring. Failure to do so will cause equipment damage and will not be covered by your warranty RCD Breaker Hot tub control box • All hot tubs must be protected with a appropriately sized RCD (Residual
Current Device) in the consumer panel. Have your electrician verify using the diagram opposite. ADDITIONAL ITEMS NEEDED TO HELP COMPLETE ELECTRICAL CONNECTION: 1. RCD Breaker, 2 Electrical cable (check length and width for amperage and distance), 3. Cable gland 4 Tidy clips ELECTRICAL REQUIREMENTS FOR WIRED HOT TUBS Spa System Box J 6 PUMP 1 J31=CE HTR SEL J56 J57 J55 J59 K2 J F6 30A J60 J41 J51 J52 3 TB1 F6 30A J36 J12 0 J36 J12 3 4 J60 J41 J51 J52 J98 J109 K1 J19 230V 115V 115V T1 K6 AUX* J18 J20 J24 F3 0.3A SLO-BLOW 2 (8) 1 J50 K8 J34 MAIN J35 MAIN J5 AUX J108 J107 J91 J101 J27 J51 J52 J98 J37 J72 J4 J42 J1 J3 J47 J61 J36 J12 J88 J62 J45 J79 J54 J77 J75 J78 J53 J58 4 J J13 K12 F8 30A 1 TB1 J32 OZONE J81 J39 F7 10A 250VAC K9 J10 J43 CIRC PUMP J38 F2 10A 250VAC PUMP 1 J33 K4 J56 J57 J55 J59 J46 A/V HOT J9 K2 F6 30A 4 J53 5 9 4 7 5 8 0 4 3 1 J110 J37 J72 J4 J42 1 2 5 2 AUX* OZONE J18 J19 J34 MAIN 230V
115V 115V J35 MAIN J108 J107 J91 T1 J101 J22 K3 2 J5 AUX J27 J23 SERIAL J26 J30 J49 J44 J48 K5 3 K6 J50 K8 K1 2 J8 AUX J25 J31 3 J15 LIGHT K7 F4 3A SLO-BLOW J111 J11 F7 10A 250VAC J81 J24 J109 F3 0.3A SLO-BLOW 1 2 J13 F8 30A 1 TB1 J32 K12 10 GND ON S1 J40 J29 VAC J7 J60 J41 J39 CIRC PUMP K9 J10 J43 F2 10A 250VAC J38 J20 J33 K4 J6 F6 30A 1 J46 J56 J57 J55 J59 PUMP 1 J9 K2 A/V HOT J25=HTR1 J26=HTR2 J27=HTR3 J30=TEST J31=CE HTR SEL J51 J52 TB1 J25=HTR1 J26=HTR2 J27=HTR3 J30=TEST J31=CE HTR SEL 5 9 4 7 5 8 J60 J41 3 1 Single Phase (live 1, neutral 1, live3 2, neutral 2, ground)]2 4 J53 230VAC, 50/60Hz, 2þ, 16A, (Circuit Breaker rating = 20A max each phase line.) J 4 J J56 J57 J55 J59 K2 2 5 A.) Single Phase connection (most common): J 6 PUMP 1 J31=CE HTR SEL J37 J72 J4 J42 1 1 Spa System Box J28 REMOTE J17 AUX FRZ J16 CAMBRIDGE TP500 Installation: Electrical power requirements B.) 2 x Single Phase
(live 1, neutral 1, live 2, neutral 2, ground)] 230VAC, 50/60Hz, 2þ, 16A, (Circuit Breaker rating = 20A max each phase line.) In 2x16A Service: Pump 2 (if any) and the Heater are on one service. Everything else is on the other service. For 2-Wire connection: 1.Completely remove jumper on J51 and J88 2.Completely remove jumper on J52 and J62 3. Make a connection between jumper J60 andJ36 4. Make a connection between jumper J41 and J12 5. Make a connection between jumper J46 and J75 6. Make a connection between jumper J20 and J77 7. Make a connection between jumper J38 and J54 8. Put DIP switches A2, A3 and A5 on ON C.) 3-Phase 5 wires (live 1, live 2, live 3, neutral, ground)] 400VAC, 50/60Hz*, 3þ, 16A, ( Circuit Breaker rating = 20A max each phase line.) In 3x16A Service: Pump 2 is on one service. The Heater is on another service. Everything else is on the remaining service. For 3-phase connection: 1.Completely remove jumper on J51 and J88 2.Completely remove jumper on J52 and J62
3. Make a connection between jumper J60 andJ45 4. Make a connection between jumper J41 and J79 5. Put DIP switches A2 and A3 on ON and DIP switch A5 on OFF POWERING UP YOUR SPA Once the spa is properly wired and filled with water, the spa power can be turned on and Start-up chemicals added. 5. The default pre-set temperature is 365°C The last measured temperature is constantly displayed on the LCD readout. This temperature will be current only when the pump has been running for at least 2 minutes. Set the desired temperature between 26- 40°C (80-104°F) by pressing the temp button(s). If the water temperature is below the set temperature, the spa’s heater and heat indicator light will turn on. All features of the Topside Console will be available. The spa will heat approximately 1° every 30 minutes per 1,000 litres. 1. Turn on RCD breaker If breaker trips immediately check Neutral and Ground Wire connections. Upon initial power up, 4 sets of numbers flash on the
LED display of the topside Console. The last number in the sequence is the incoming power meter which can be used to verify that the spa is wired correctly. 2. The spa begins an automatic priming routine which will last 6 minutes (“Pr” is on the LED display). 3. The priming routine will automatically run each spa pump to prime. When the “Pr” is displayed, press any PUMP button to prime that pump or wait for the priming routine to turn on the Pump. IMPORTANT: To avoid pump damage, do not run pumps for more than 1 minute without moving water. If no water is moving, turn the power off and perform air lock procedure. 4. The Topside Console display flashes “38C/100F” then press “--C/F” for approximately 2 minutes to determine water temperature as it flows through the heater. 6. Check for leaks! Although spas are fully checked at the factory, shipping & delivery might cause a leak. Remember to pay particular attention to barrel unions adjoining the
heater. Contact your Canadian Spa dealer directly if there is a problem. If your new spa pump does not prime (flow) on the initial start-up you may be experiencing an “air lock”. This normal occurrence can be easily corrected by loosening the plumbing union on the suction side of the Jet or Pump until water flows into the pump and all air is expelled. PRESS BUTTONS SLOWLY FOR FIRST RUN WHEN STARTING UP ONCE PR EXITS, SET TEMPERATURE ON SPA (SEE SPA OPERATION SECTION FOR DIFFERENT SPA TOPSIDES) (9) CAMBRIDGE TP500 How your spa functions DRAIN VALVE OZONE LINE CHECK VALVE OZONE UV (OPTIONAL) T VALVE OZONE MIXING CHAMBER MAZZEI INJECTOR BP CONTROL PUMP HEATER T VALVE MICROBAN® FILTER INHIBITS BACTERIAL GROWTH ATTACHING YOUR SPA COVER The Spa Cover is an important accessory to help preserve the spa’s temperature. The Spa Cover also serves as a safety device, preventing unauthorised users from entering the spa. Proper installation of the Spa Cover is an important
addition in the spa installation. 1) Remove Spa Cover from packaging. 2) Place Spa Cover on spa in order to allow easy access to the topside console when opening the cover. 3) Line up attaching straps and secure with mounting hardware and use locking mechanism to lock Spa Cover in place. IMPORTANT: Always lock Spa Cover in place when not using the spa. Do not walk or sit on Spa Cover Remove snow build-up to avoid breaking the foam inner core. Do not drag Spa Cover on rough surfaces. TOP MOUNT”HOT TUB COVER LIFTER Fully compatible with ALL our Canadian Spa hot tubs and spas and most other brands; this Cover Lifter is the ideal choice to complement your Hot Tub, making cover removal and replacement a quick, one-handed operation and reducing wear and tear. • Low-profile design • Virtually zero clearance required behind spa – great for tight spaces (particularly if your spa is located in a gazebo) • Mounts directly to the spa • Fits up to 2.4m Spas • Made of Aluminium BOTTOM
MOUNT” HOT TUB COVER LIFTER. Fully compatible with Canadian Spas; this Cover Lifter is the ideal choice to complement your hot tub or spa, making cover removal and replacement a quick, one-handed operation while reducing wear and tear on your hot tub cover. • Mounts directly to the spa • Made of black powder-coated Aluminum • Requires 31cm - 46 cm rear clearance LED LIGHTING Change the colour of your spa with a press of a button, 13 colour options to choose from. Chromatherapy is a great way to relax in your spa using clours to change your mood (10) CAMBRIDGE TP500 Spa Functions Pumps Press the “Jets 1” button once to turn pump 1 on or off, and to shift between low- and high-speeds if equipped. If left running, the pump will turn off after a time-out period. The pump 1 low-speed will time out after 30 minutes. The high-speed will time out after 15 minutes. Temperature and Temp Range Adjusting the Set Temperature When using a panel with Up and Down buttons
(Temperature buttons), pressing Up or Down will cause the temperature to flash. Pressing a temperature button again will adjust the set temperature in the direction indicated on the button. When the LCD stops flashing, the spa will heat to the new set temperature when required. The low-speed of pump 1 runs when the other pump is on. If the spa is in Ready Mode, Pump 1 low may also activate for at least 1 minute every 30 minutes to detect the spa temperature (polling) and then to heat to the set temperature if needed. When the low-speed turns on automatically, it cannot be deactivated from the panel, however the high speed may be started. TEMPERATURE UP TEMPERATURE DOWN Filtration and Ozone Pump 1 low and the ozone generator will run during filtration. The system is factory-programmed with two filter cycles that will run 10 minutes after power-up. The filter duration is programmable. Pressing the button again will cause the temperature to change in one direction (e.g UP) After
allowing the display to stop fl ashing, pressing the Temperature Button will cause the temperature to flash and the next press will change the temperature in the opposite direction (e.g DOWN) The temperature can be set between 16°C and 40°C (60°F and 104°F) Freeze Protection If the temperature sensors within the heater detect a low enough temperature, then the pump automatically activate to provide freeze protection. The pump will run either continuously or periodically depending on conditions. Press-and-Hold If a Temperature button is pressed and held when the temperature is flashing, the temperature will continue to change until the button is released. If only one temperature button is available and the limit of the Temperature Range is reached when the button is being held, the progression will reverse direction. In colder climates, an optional additional freeze sensor may be added to protect against freeze conditions that may not be sensed by the standard sensors. Auxiliary
freeze sensor protection acts similarly except with the temperature thresholds determined by the switch. See your dealer for details LIGHTS Press light button to turn on and off the lights. Each consecutive press will alternate through different lighting modes and colours. Clean-up Cycle When a pump is turned on by a button press, a clean-up cycle begins 30 minutes after the pump is turned off or times out. The pump and the ozone generator will run for 30 minutes or more, depending on the system. LED CUP HOLDERS : Placeholder for drinking receptacle. Air Controller These are located around the top of your spa. Increase or decrease the force of your jets by opening or closing the air control valves. Waterfall Control Located on the topside of the spa, this valve adjusts water flow to the waterfall. Jets 5 HP Big Red 2 Speed pump Our 5 HP pump is the most powerful spa pump in the market with our oversize intakes. Aroma Basket Cap Fountain & Waterfall Open cap to place
aromatherapy beads. Close after use Features on the Cambridge (11) CAMBRIDGE TP500 Chemical Guide FREE Water Test App Starter Chemical Kit Deluxe Chemical Kit KA-10122 KA-10089 Chlorine Granules - Disinfection To protect your health, ensure that your spa water is disinfected thoroughly on a regular basis. This is particularly important in spas, as the high water temperatures provide an ideal breeding ground for bacteria. To prevent water care problems, there must always be sufficient levels of disinfectant in the water. The use of Chlorine granules is the traditional method of disinfecting spas. Chlorine granules dissolve quickly, without residues, and do not bleach the surfaces. The granules are pH-neutral, ie the pH value of the water does not change with the dosing of the granules. Check the pH value using the 3 function test strips at least once a week, and, if necessary, adjust it to 7.2 – 7.6 Add 10 g/m³ of Chlorine granules after each bathing session Let the
circulation pump run for 10 minutes, and then check afterwards using 3 function test strips that the ideal value of 1.0 – 15 ppm (mg/L) is reached. If necessary, continue to dose The granules are dosed directly into hot tub water KA-10087 pH Up and pH Down Foam Free The pH value is the basis for reliable disinfection. The care products only work perfectly when the levels are correct, meaning the water is not harmful to skin, hair or eyes. The ideal pH value is between 72 and 76 The pH value is influenced by various factors. For example it increases when fresh water is added. Increasing the water temperature or using the jets changes the pH value. Therefore, check the value at least once a week and, if necessary, increase the levels using pH Up or decrease with pH Down. The granules are dosed directly into the spa water. pH Up: KA-10051 pH Down: KA-10050 If your spa water has a tendency to foam, then we recommend you add Foam Free. The product is added directly to the spa water.
If the water continues to foam, even after the product has been added, replace the water. KA-10054 Scale Control Alkalinity Booster The overall hardness is a measure of the amount of calcium and magnesium in the water. Scale Control prevents calcium precipitations forming on the walls and in the pipes of your spa. You can find out the overall hardness level of your water by contacting your local water supplier. With a level over 200 ppm (mg/L)., heating the water can cause limescale deposits on the walls, creating rough surfaces. To prevent limescale deposits, always use Scale Control after refilling. KA-10055 Alkalinity booster will prevent erratic changes in the pH level of the spa/hot tub water. Alkalinity Booster will help the bromine or chlorine in the spa/hot tub work more efficiently. Alkalinity Booster raises the total alkalinity of the spa/hot tub water preventing any corrosion that could be cause by low alkalinity. KA-10056 Spa shock Spa Clear Spa shock will destroy
foreign contaminates which reduce the effectiveness of Bromine and Chlorine and as a disinfectant Spa Shock is completely soluble and will not alter pH. KA-10047 Super highly Concentrated Clarifier • Adds brilliance back to spa water • Aids filter in removing suspended particles • Non-toxic. Will not affect pH level • Reduces chlorine demand when used regularly • Restores water clarity KA-10053 (12) CAMBRIDGE TP500 Test strips Helps to keep your spa clean and achieve crystal clear water! Canadian Spa 3 Way Test strips to check the levels of Chlorine, PH and Total Alkalinity. Simple and easy to use. Ensure your spa is always safe to use. Pack of 50 strips Dip a test strip into the water and compare to the colour chart to take readings for: - Chlorine, pH, Total Alkalinity. TIP: Chlorine and pH should be checked EVERY TIME the spa is used to ensure that the water is safe to use! Go to App, put in your test results and it will tell you what to add and how much.
KA-10052 Canadian Spa Company Spa Ball KA-10003 pH SCALE pH LOW pH NORMAL • Reduced efficacy of disinfection • Corrosion of metals 7.2 -76 pH HIGH • Reduced efficacy of disinfection • Skin & eye irritation • Skin & eye irritation • Forms limescale deposits • Unpleasant odour • Staining of the filter TROUBLESHOOTING GUIDE PROBLEM POSSIBLE CAUSE SOLUTION CLOUDY WATER A) organic contaminants build-up B) suspended particles C) pH high D) total alkalinity too high E) poor filtration F) high dissolved solids A) shock treatment with Granular Chlorine B) add Granular Chlorine, use SPA-BALL C) add pH DOWN until pH level reads 7.2–76 D) add pH DOWN, adjust total alkalinity to 80–150 p.pm E) dirty filter, replace filter F) empty spa and refill COLOURED WATER Debris in water Use Chlorine Granules. FOAMING High concentration of oils and organic contaminants being agitated by jet Squirt FOAM-FREE on foam. Use the SPA-BALL SCALE DEPOSITS High
calcium level, high pH, high alkalinity Drain partially, add Granular Chlorine, correct pH level to 7.2–76 and alkalinity to 80–150 ppm ODOUR High level of organic contaminants combined chlorine. Shock with Granular Chlorine Chlorine level too high EYE/SKIN IRRITATION A) pH too low B) combined chlorine due to high concentration of organic contaminants A) add pH up until level is 7.2–76 B) shock with Granular Chlorine, add disinfectant NO CHLORINE/ BROMINE READING A) high concentration of organic contaminants using up sanitizers B) test trips may be ineffective A) add Granular Chlorine B) replace at least once a year, keep cool and out of sunlight (13) CAMBRIDGE TP500 1 Pump Control System (TP500) Initial Start-up When your spa is first activated the display will do a count sequence of M100, L232, V52, 1-3 afterwards a message will display ‘RUN PUMPS PURGE AIR’ on Priming Mode - now press the JET Button to make sure the pump is running and water flowing from the
jets. If there is no movement of water please visit our Service Portal: supportcanadianspacompanycom submit a ticket in our system and our global team will effectively solve your issue quickly and efficiently 24/7. Priming Mode will run for approximately 5 minutes (Press TEMP-UP to skip Priming Mode) then the spa will begin to run Jets on low speed and after a few minutes the heater will start when in ‘R’ (Ready Mode). MENU Press for Menu options TEMP UP Increase Temperature JETS Activates jets TEMP DOWN Decrease Temperature LIGHTS On/Off/ Light modes Display Symbols A - Heat B - Ready Mode C - Rest Mode D - bbaTM 2 On E - WiFi (Cloud Connection) F - Light G - Cleanup Cycle H - Jets 1 I - Jets 2 J - Blower (14) K - Auxiliary (Jets 3 or Microsilk) L - Temperature Range (High/Low) M - Set (Programming) N - Filter Cycle (1 or 2 or Both) O - AM or PM (Time) CAMBRIDGE TP500 Standard Settings 1 x Pump Press Menu button until you reach the mode you require. TEMP FLTR 1 -
Temp Up button – until arrow is either pointing up or down. (Arrow up will maintain heat / Arrow down will drop the temp by 10 degrees.) - Menu button to select. - Temp Up button – BEGN will be displayed. - Temp Up button – Hour will be flashing. • Press Temp Up button to cycle to the hour preferred to start. - Menu button to select – minutes now flash. • Temp Up to adjust the minutes – goes up 15 minutes with every press. - Menu button to select. RUN HRS is then displayed. - Temp Up button – press to how many hours you would like the filtration cycle to run. (recommended filtering cycle - 4 hours twice a day) - Menu button to select. • Minutes – press TEMP Up button – goes up in 15 minutes every press. - F1 ENDS - Menu button to select. MODE - Temp Up button – press until either Ready or Rest is displayed (Ready maintains its set temperature / Rest will only heat within the filtration cycles) - Menu
button to select. SET TIME - Temp Up button – hour will flash on display. • press Temp up button until desired hour. - Menu button to select – minutes will flash. • press Temp Up button until desired minute. - Menu button to select. FLTR 2 FLIP - Temp Up button – OFF will be displayed press Temp Up for it to be ON - Menu button to select. - Temp Up button – BEGN will be displayed. - Temp Up button – Hour will be flashing. • Press Temp Up button to cycle to the hour preferred to start. - Menu button to select – minutes now flash. • Temp Up to adjust the minutes – goes up 15 minutes with every press. - Menu button to select. - RUN HRS is then displayed. - Temp Up button – press to how many hours you would like the filtration cycle to run. - Menu button to select. • Minutes – press TEMP Up button – goes up in 15 minutes every press. - Menu button to select. F2 ENDS – press MENU button to select. - Temp Up button –
will invert the display so it can be seen in spa. - Menu button to select. LOCK Panel Lock - Temp Up button – PANEL will be displayed. • Temp Up button - cycle between On and Off. • Once ON is displayed press MENU button to select. (The buttons on topside panel will now be unresponsive) Temp Lock - Temp DOWN button – TEMP will be displayed. • Temp up button – cycle between On and Off. • Once ON is displayed press MENU button to select. (The Temperature buttons will now be unresponsive – jet buttons will work) UNLOCK - Press and hold down TEMP UP while you press the MODE Button 2x Slowly. (Topside panel is now unlocked and normal operations enabled) PREF HOLD UTIL Service tech Service tech - Temp Up button – ‘HOLDING FOR 1:00’ will be displayed. (Pump/s will shut down for 1 minute to allow time to replace filters) - Press Temp Up-to restart or wait for the minute HOLD to end. (15 CAMBRIDGE TP500 Trouble shooting
ISSUE POSSIBLE CAUSE SOLUTION Breaker or RCD off Check that RCD breaker is turned ON • No power Loose wire connection Check wire connections • RCD trips Mis-wired Check wiring per diagram, especially neutral wire Component failure Perform elimination test to determine failed component. See elimination test section • Heater not operating or spa not heating Temperature set to low Set temperature above current water temperature Water level too low Add water until water level is 1 inch (25mm) above Water Line Blown fuse Check 30amp bus fuse on control board Component failure Contact dealer • Pump not operating or turns off Air lock See Air lock procedure after a short time Improper voltage to pump Contact dealer or qualified electrician Time out As a safety precaution, the Spa Controller only allows Pump operation for 15 minutes continuously Component failure Contact dealer or qualified
electrician Thermal overload During extreme high ambient temperatures the pump motor may reach the motor thermal overload limit. Wait until motor cools and retry. If problem persists contact dealer • Pump surging Low water level Add water until water level is 1 inch (25mm) above water line • Light will not turn on Burned out bulb Change bulb Light bulb may have fallen out Unscrew back housing and reinsert bulb • Ozone Generation Unit will not Blown fuse Check Ozone fuse operate Burned out UV bulb Replace unit Component failure Contact dealer • No water Flow from Jets Air lock See air lock procedure Adjustable jets turned off Turn jets on Faulty pump or motor Contact dealer Slice valve closed Open slice valve Clogged filter Clean or change filter • Jet popped Out Jet face not seated Insert jet and turn clockwise until jet snaps into place you will feel the jet seat Broken jet
Contact dealer Adjustable jets turned off Turn jets on • No air flow from jet Air control valve not open Open air control valve Broken jet Contact dealer Jet not seated properly Insert jet and turn clockwise until jet snaps into place as it seats • Noisy Pump or Motor Air lock See air lock procedure Low water level Add water until water level is 1 inch (25mm) above water line Clogged filter Clean or replace filter Damaged or warn motor bearings Contact dealer • Spa Overheating High ambient temperature During extreme high ambient temperatures the spa may over heat due to internal friction with in the plumbing. Reduce set temperature or remove spa cover to cool. Filtration duration Reduce filtration cycle duration to minimum setting • Spa will not turn off Spa is trying to heat Check set temperature or heat indicator light on topside console is ON Spa is on high filter cycle
Check filter cycle and reduce to 2 or 4 • Abnormal water Excessive evaporation Check and adjust spa cover if needed Excessive splashing Monitor water level after each use Dirty or clogged filter Clean or replace filter • Water not clean Poor water chemistry See common water problems section Insufficient filtration Cycle duration Based on usage ,adjust filtration cycle duration High solids content See common water problem section (16) CAMBRIDGE TP500 Fill it up! Preparation and Filling Fill the spa to its correct operating level. Be sure to open all valves and jets in the plumbing system before filling to allow as much air as possible to escape from the plumbing and the control system during the filling process. After turning the power on at the main power panel, the top-side panel display will go through specific sequences. These sequences are normal and display a variety of information regarding the configuration of the hot tub control.
Priming Mode - MO19* This mode will last for 4-5 minutes or you can manually exit the priming mode after the pump(s) have primed. Regardless of whether the priming mode ends automatically or you manually exit the priming mode, the system will automatically starts normal heating and filtering at the end of the priming mode. During the priming mode, the heater is disabled to allow the priming process to be completed without the possibility of energizing the heater under low-flow or no-flow conditions. Nothing comes on automatically, but the pump can be energized by pushing the “Jets” or “Aux” buttons. Priming the Pump As soon as the above display appears on the panel, push the “Jets” button once to start the Pump in low-speed and then again to switch to high-speed. will now be running in high-speed to facilitate priming If the pump has not primed after 2 minutes, and water is not flowing from the jets in the spa, do not allow the pump to continue to run. Turn off the pump
and repeat the process Note: Turning the power off and back on again will initiate a new pump priming session. Sometimes momentarily turning the pump off and on will help it to prime. Do not do this more than 5 times If the pump will not prime, shut off the power to the spa and call for service. Important: A pump should not be allowed to run without priming for more than 2 minutes. Under NO circumstances should a pump be allowed to run without priming beyond the end of the 4-5 minute priming mode. Doing so may cause damage to the pump and cause the system to energize the heater and go into an overheat condition. Exiting Priming Mode You can manually exit Priming Mode by pressing the “Warm” or “Cool” button. Note that if you do not manually exit the priming mode as described above, the priming mode will be automatically terminated after 4-5 minutes. Be sure that the pump have been primed by this time. Once the system has exited Priming Mode, the top-side panel will momentarily
display the set temperature but the display will not show the water temperature yet, as shown below. This is because the system requires approximately 1 minute of water flowing through the heater to determine the water temperature and display it. (17) CAMBRIDGE TP500 Ready Mode and Rest Mode In order for the spa to heat, a pump needs to circulate water through the heater. The pump that performs this function is known as the “primary pump.” Primary pump is a 2-Speed Pump 1, Ready Mode (indicated by ) will circulate water periodically, using Pump 1 Low, in order to maintain a constant water temperature, heat as needed, and refresh the temperature display. This is known as “polling.” Rest Mode (indicated by ) will only allow heating during programmed filter cycles. Since polling does not occur, the temperature display may not show a current temperature until the primary pump has been running for a minute or two. In Rest Mode, the spa will only heat to set temperature during
programmed filter times. Water Temperature Setting (18 CAMBRIDGE TP500 Show and Set Time-of-Day Be sure to set the Time-of-Day Setting the time-of-day can be important for determining filtration times and other background features. When in the TIME menu, SET TIME will flash on the display if no time-of-day is set in the memory. 24-hour time display can be set under the PREF menu. Note: This note refers to systems that do not keep track of Time-of-Day when powered down. If power is interrupted to such a system, Time-of-Day is not stored. The system will still operate and all other user settings will be stored. If filter cycles are required to run at a particular time of day, resetting the clock will return the filter times to the actual programmed periods. When such a system starts up, it defaults to 12:00 Noon, so another way to get filter times back to normal is to start up the spa at noon on any given day. SET TIME will still flash in the TIME Menu until the time is
actually set, but since the spa started at noon, the filter cycles will run as programmed. Flip (Invert Display) (19) CAMBRIDGE TP500 Restricting Operation The control can be restricted to prevent unwanted use or temperature adjustments. Locking the panel prevents the controller from being used, but all automatic functions are still active. Locking the Temperature allows Jets and other features to be used, but the Set Temperature and other programmed settings cannot be adjusted. Temperature Lock allows access to a reduced selection of menu items. These include Set Temperature, FLIP, LOCK, UTIL, INFO and FALT LOG Unlocking This Unlock sequence may be used from any screen that may be displayed on a restricted panel. If the panel has both an UP and a Down button, the ONLY button that will work in the Unlock Sequence is the UP button. The temperature will not Unlock if the Unlock sequence is done while the panel is displaying “LOCK”. Light Timer Programming Light Timer Option
If LITE TIMR does not appear in the Main Menu, the Light Timer feature is not enabled by the manufacturer. When available, the Light Timer is OFF by default. (20) CAMBRIDGE TP500 Adjusting Filtration Main Filtration Filter cycles are set using a start time and a duration. Start time is indicated by an “A” or “P” in the bottom right corner of the display. Duration has no “A” or “P” indication Each setting can be adjusted in 15-minute increments The panel calculates the end time and displays it automatically. Filter Cycle 2 Optional Filtration Filter Cycle 2 is OFF by default. It is possible to overlap Filter Cycle 1 and Filter Cycle 2, which will shorten overall filtration by the overlap amount. Purge Cycles In order to maintain sanitary conditions, the pump will purge water from their respective plumbing by running briefly at the beginning of each filter cycle. If Filter Cycle 1 is set for 24 hours, enabling Filter Cycle 2 will initiate a purge when Filter
Cycle 2 is programmed to begin. Hold Mode – MO37 Hold Mode is used to disable the pump during service functions like cleaning or replacing the filter. Hold Mode will last for 1 hour unless the mode is exited manually. Drain Mode Some spas have a special feature that allows a pump to be employed when draining the water. When available, this feature is a component of Hold Mode. Drain Mode will time out with Hold Mode. (21) CAMBRIDGE TP500 Preferences F / C (Temp Display) Change the temperature between Fahrenheit and Celsius. 12 / 24 (Time Display) Change the clock between 12 hr and 24 hr display. RE-MIN-DERS (Reminders) Turn the display of reminder messages (like “Clean Filter”) On or Off. Note: Reminders continue to run in the background even when not displayed. So turning the display of Reminders On or Off does not reset any Reminder counts. CLN-UP (Cleanup) Cleanup Cycle Duration is not always enabled, so it may not appear. When it is available, set the length of
time Pump 1 will run after each use. 0-4 hours are available Additional Utilities Utilities In addition to INFO, The Utilities Menu contains the following: A / B (A/B Sensor Temperatures) When this is set to On, the temperature display will alternate to display temperature from Sensor A and Sensor B in the heater. FALT LOG (Fault Log) The Fault Log is a record of the last 24 faults that can be reviewed by a service tech. (22) CAMBRIDGE TP500 General Messages Priming Mode – MO19 Each time the spa is powered up, it will enter Priming Mode. The purpose of Priming Mode is to allow the user to run each pump and manually verify that the pump is primed (air is purged) and water is flowing. This typically requires observing the output of each pump separately, and is generally not possible in normal operation. Priming Mode lasts 4 minutes, but you can exit it earlier by pressing any Temp button. The heater is not allowed to run during Priming Mode. Water Temperature is Unknown
After the pump has been running for 1 minute, the temperature will be displayed. Too Cold - Freeze Protection A potential freeze condition has been detected, or the Aux Freeze Switch has closed, and the pump is activated, depending on how your system was built. The pump is ON for at least 4 minutes after the potential freeze condition has ended, or when the aux freeze switch opens. Appears on a regular schedule, e.g every 180 days Vinyl covers should be cleaned and conditioned for maximum life. normal display. Appears on a regular schedule, e.g every 365 days Filters should be replaced occasionally to maintain proper spa function and sanitary conditions. Appears on a regular schedule, e.g every 365 days Check your ozone and/or UV generator per your spa manufacture’s instructions. normal display. Water is too Hot (OHS) – MO29 One of the water temp sensors has detected spa water temp 110°F (43.3°C) and spa functions are disabled System will auto reset when the spa
water temp is below 108°F (42.2°C) Check for extended pump operation or high ambient temp. J29 Warning – MO44 J29 is typically used as a Heater Disable input. As such, it should not typically be shorted at power-up. This message appears if J29 is shorted at power-up. Reminder Messages Alternates with temperature or Appears on a regular schedule, e.g every 90 days Change the water in the spa on regular basis to maintain proper chemical balance and sanitary conditions. normal display. Alternates with temperature or Appears on a regular schedule, e.g every 365 days Have a service technician do a check-up on your spa per your spa manufacturer’s instructions. In some cases, the pump may turn on and off and the heater may operate during Freeze Protection. This is an operational message, not an error indication. normal display. Alternates with temperature or Alternates with temperature or (23) CAMBRIDGE TP500 Heater-Related Messages Sensor-Related Messages
Heater Flow is Reduced (HFL) – MO16 There may not be enough water flow through the heater to carry the heat away from the heating element. Heater start up will begin again after about 1 min. See “Flow Related Checks” below. Sensor Balance is Poor – MO15 The temperature sensors MAY be out of sync by or 3°F. Call for Service. Heater Flow is Reduced (LF)* – MO17 There is not enough water flow through the heater to carry the heat away from the heating element and the heater has been disabled. See “Flow Related Checks” below After the problem has been resolved, you must press any button to reset and begin heater start up. Heater may be Dry (dr)* – MO28 Possible dry heater, or not enough water in the heater to start it. The spa is shut down for 15 min Press any button to reset the heater start-up. See “Flow Related Checks” below Heater is Dry* – MO27 There is not enough water in the heater to start it. The spa is shut down. After the problem has been resolved, you
must press any button to reset and restart heater start up. See “Flow Related Checks” below. Heater is too Hot (OHH)* – MO30 One of the water temp sensors has detected 118°f (47.8°C) in the heater and the spa is shut down. You must press any button to reset when water is below 108°f (42.2°C) See “Flow Related Checks” below. A Reset Message may Appear with other Messages. Some errors may require power to be removed and restored. Sensor Balance is Poor* – MO26 The temperature sensors ARE out of sync. The Sensor Balance is Poor fault has been established for at least 1 hour. Call for Service. Sensor Failure – Sensor A: MO31, Sensor B: MO32 A temperature sensor or sensor circuit has failed. Call for Service. Miscellaneous Messages No Communications The control panel is not receiving communication from the System. Call for Service Pre-Production Software The Control System is operating with test software. Call for Service. °F or °C is replaced by °T The Control
System is in Test Mode. Call for Service * This message can be reset from the topside panel with any button press. Flow-Related Checks Check for low water level, suction flow restrictions, closed valves, trapped air, too many closed jets and pump prime. On some systems even when spa is shut down, some equipment may occasionally turn on to continue monitoring temperature or if freeze protection is needed. (24) CAMBRIDGE TP500 Sensor-Related Messages Reminder Messages General maintenance helps. The display of Reminder Messages can be suppressed by using the PREF Menu. Memory Failure - Checksum Error* – MO22 At Power-Up, the system has failed the Program Checksum Test. This indicates a problem with the firmware (operation program) and requires a service call. Reminder Messages can be chosen individually by the Manufacturer. They may be disabled entirely, or there may be a limited number of reminders on a specific model. The frequency of each reminder (e.g 7 days) can be
specified by the Manufacturer. Memory Warning - Persistent Memory Reset* – MO21 Appears after any system setup change. Contact your dealer or service organization if this message appears on more than one power-up, or if it appears after the system has been running normally for a period of time. * This message can be reset from the topside panel with any button press. Press a Temperature button to reset a displayed reminder message. normal display. Appears on a regular schedule, e.g every 7 days Check pH with a test kit and adjust pH with the appropriate chemicals. Memory Failure - Clock Error* – MO20 - Not Applicable on the BP1500 Contact your dealer or service organization. normal display. Configuration Error – Spa will not Start Up Contact your dealer or service organization. A Pump Appears to have been Stuck ON when spa was last powered - MO35 POWER DOWN THE SPA. DO NOT ENTER THE WATER Contact your dealer or service organization. * This message can be reset
from the topside panel with any button press. Alternates with temperature or Appears on a regular schedule, e.g every 7 days Check sanitizer level and other water chemistry with a test kit and adjust with the appropriate chemicals. A Pump Appears to be Stuck ON – MO34 Water may be overheated. POWER DOWN THE SPA DO NOT ENTER THE WATER. Contact your dealer or service organization The water level is too low Some systems have a water level detect, and this message appears if it detects that the water level is too low. Alternates with temperature or normal display. Alternates with temperature or Appears on a regular schedule, e.g every 30 days Clean the filter media as instructed by the manufacturer. See HOLD on page 9. Appears on a regular schedule, e.g every 30 days Residual Current Device (RCD) is an important safety device and must be tested on a regular basis to verify its reliability. Every user should be trained to safely test the RCD associated with the hot tub
installation. An RCD will have a TEST and RESET button on it that allows a user to verify proper function. Warning: If freezing conditions exist, a RCD should be reset immediately or spa damage could result. The end user should always trained to test and reset the RCD on a regular basis. (25) CAMBRIDGE TP500 CN6013 Board SC30 Buss fuse 30 Amp KK-10382 Glass fuse 10 Amp KK-10376 f3 fuse topside 1/8 KK-11107 DIP Switch Functions Fixed-function DIP Switches A1 Test Mode (normally Off). A2, A3 and A4 work in combination to determine the number of high-speed devices and blowers that can run before the heat is disabled i.e A2 and A3 in the ON position and A4 in the OFF position will allow the heater to operate with up to 3 high-speed pumps (or two HS Pumps and Blower) running at the same A2 In “ON” position, add one high-speed pump (or blower) with Heater. time Heat is disabled when the fourth high-speed pump or blower is turned on. Note: A2/A3/A4 all off = No heat with any high
or blower. A3 In “OFF” position, add two high-speed pump with Heater. A4 In “OFF position, add 4 high-speed pump with Heater. J31 Jumper on 1 pin with 2.0kW or smaller heater Jumper on 2 pins with 3.0kW or higher heater A5 In “ON” position, enables Special Amperage Rule B. means heater shuts off when pump is on high speed A6 Persistent memory reset (Used when the spa is powering up to restore factory settings as determined by software configuration). A7 in Off position 1 minute cool down fo relectric heating on for 5 minute cool down for gas heating A8 in Off position not assigned A9 in Off position not assigned A10 in Off position not assigned WARNING: Setting DIP switches or jumpers incorrectly may cause abnormal system behavior and/or damage to system components. Refer to Switchbank illustration on Wiring Configuration page for correct settings for this system. (27) CAMBRIDGE TP500 Set ups (28) CAMBRIDGE TP500 LIMITED WARRANTY Canadian Spa Co.
Manufacturing extends the following warranties to the original purchasers of its portable spas: Structural Warranty: Canadian Spa Co. warrants structure of the spa shell against water loss due to structural failure for the period of 10 years from the date of purchase by the original owner. If in Canadian Spa Co opinion, structure proves to be defective Canadian Spa Co. will repair or, at its option, replace the defective structure without charge to the customer Surface Warranty: Canadian Spa Co. warrants the acrylic finish against defects in material and workmanship and specifically against blistering, cracking or delamination for the period of two (2) years from the original purchase date to the original purchaser. If, in Canadian Spa Co. opinion, the surface proves to be defective during this period, Canadian Spa Co. will repair or, at its option, replace the defective spa shell without charge to the customer. Plumbing Warranty: Canadian Spa Co. warrants the plumbing of the spa will
remain free from leaks for the period of two (2) years from the date of purchase to the original purchaser. Equipment Warranty: Canadian Spa Co. warrants the equipment pack (pump, heater, and control system) against malfunction and defects in the materials and workmanship for two (2) years from the date of purchase to the original purchaser. Skirting Warranty: Canadian Spa Co. warrants the wood skirting surrounding the spa to be free from defects in materials and workmanship at the time of purchase. Because wood is a natural product and subject to weathering, any fading, crazing, cracking or warping of the wood finish is not covered. Extent of Warranty: This Limited Warranty applies to portable spas manufactured after March 1st 2021 and sold by authorised Canadian Spa Co. dealers to residential retail customers. This Limited Warranty is given only to the first retail purchaser and terminates upon transfer of ownership. No warranty is provided on light bulbs, light lens covers, filters
or any dealer installed accessories. Cost of installation, removal and/or shipping of the spa is not covered by this Limited Warranty. In the event Canadian Spa Co deems necessary the removal of the spa to a place of repair or that the spa must be replaced, any and all costs of the spa removal and replacement; landscaping, decking, fencing and/or structure removal, alteration and/or replacement; or other costs of providing access to the spa will be for the purchaser. This Warranty applies only to spas in single family, residential installations. This Limited Warranty becomes void if the spa is placed in commercial application. TERMS, CONDITIONS AND LIMITATIONS Any defect or damage caused by installation, alteration or repair by anyone who is not an employee of Canadian Spa Co. or authorised service technician is not covered by the Warranty. This Warranty becomes void if the spa has been subjected to misuse, abuse, alteration or attempted alteration, repairs or attempted repairs by
anyone other than an authorised Canadian Spa Co. service technician, improper installation, improper water chemistry, improper maintenance, acts of god, or damage caused beyond the control of Canadian Spa Co. Misuse and abuse shall include any operation of the spas other than as directed in the Canadian Spa Co. Manual Examples of misuse and abuse include, without limitation: • Damage of the spa surface caused by leaving the spa uncovered while the spa is empty of water or due to covering the spa with plastic film of any kind. • Damage to the spa surface caused by contact with cleaners or solvents. • Damage caused by the operation of the spas at water temperatures outside of the range of 2 – 40 degrees Celsius. • Damage caused by unapproved sanitizer such as calcium hypochlorite, tri-chlor type chlorine or any sanitising chemical that may remain undissolved on the spa surface. • Damage caused by failure to provide even sufficient support for the spa. Warranty Performance: In
the event of a defect covered under the terms of this Limited Warranty, notify your authorised Canadian Spa Co dealer. A Canadian Spa Co authorised service technician will repair the spa subject to the Terms and Conditions of this Limited Warranty. Use all reasonable means to protect the spa from further damage. Reasonable travel charges may be assessed by Canadian Spa Co. or its authorised service technician if the spa is located outside the nearest authorised service technician’s service area. This warranty covers parts ONLY and does not include travel or on-site service charges unless a Service Contract has been purchased from Canadian Spa Co. Ltd Disclaimers: Canadian Spa Co. or any of its authorised service technicians shall not be held liable for injury, inconvenience, loss of use, chemical or water damage, transportation costs, continent liabilities or any other incidental or consequential costs, expenses or damage as result of any deficiency or alleged deficiency of the spa.
In no event shall Canadian Spa Co. be liable, for any reason or cause, in excess of the amount paid for the product. No other warranties, expressed or implied, are valid No agent, dealer, distributor, Service Company or other party is authorised to change, modify or extend the terms of this Limited Warranty in any manner whatsoever. Guarantee of the insulating cover: Canadian Spa Co. guarantees that the cover the purchase is free from defects in materials and workmanship. Where the cover is exposed to strong external influences such as extreme weather conditions, regular maintenance or protection is essential . Canadian Spa Co warrants the cover for the period of two (2) years. Defects caused by misuse or insufficient care are not covered by the warranty. SERVICE PORTAL The FAQ section provides answers to your hot tub questions. Submit a ticket in our system and our global team will effectively solve your issue quickly and efficiently 24/7. European Head Office: Canadian Spa Company
Canada House, Salbrook Road, Salfords, Redhill, Surrey, RH1 5GL, T: +44 1293 824094 www.canadianspacompanycouk France Office: Canadian Spa Company sarl 29 avenue de Grande Bretagne 66000 Perpignan, France T: +33 9970 4448004 E: support@canadianspacompany.com www.canadianspacompanycom German Office: Canadian Spa Company GmBh Hohenstaufenring 43 – 45 50674 Köln, Germany TEL: + 49 22038064038 www.canadianspacompanyde Canadian Spa Company meets ISO 9001 Standards. When you purchase a hot tub from Canadian Spa Company the ISO 9001 certification assures world class excellence in manufacturing and customer service. canadians p a c om pa ny.c om (27) KM-10105 16/03/21 Need assistance? Visit our Service Portal: support.canadianspacompanycom For Service Support please contact us anytime: support.canadianspacompanycom