Alapadatok
Év, oldalszám:2019, 18 oldal
Nyelv:angol
Letöltések száma:4
Feltöltve:2023. február 16.
Méret:1 MB
Intézmény:
-
Megjegyzés:
dundalkleisurecraft.com
Csatolmány:-
Letöltés PDF-ben:Kérlek jelentkezz be!
Értékelések
Nincs még értékelés. Legyél Te az első!Legnépszerűbb doksik ebben a kategóriában


Tartalmi kivonat
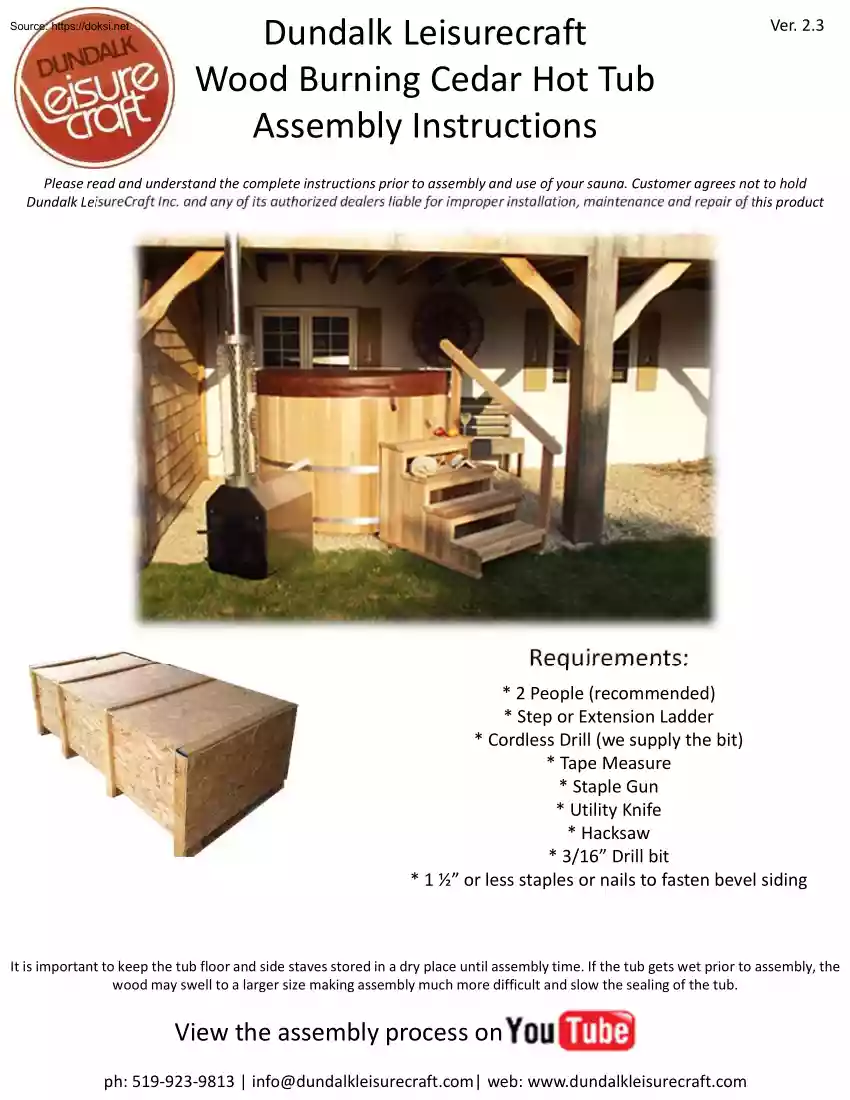
Dundalk Leisurecraft Wood Burning Cedar Hot Tub Assembly Instructions Ver. 23 Please read and understand the complete instructions prior to assembly and use of your sauna. Customer agrees not to hold Dundalk LeisureCraft Inc. and any of its authorized dealers liable for improper installation, maintenance and repair of this product Requirements: * 2 People (recommended) * Step or Extension Ladder * Cordless Drill (we supply the bit) * Tape Measure * Staple Gun * Utility Knife * Hacksaw * 3/16” Drill bit * 1 ½” or less staples or nails to fasten bevel siding It is important to keep the tub floor and side staves stored in a dry place until assembly time. If the tub gets wet prior to assembly, the wood may swell to a larger size making assembly much more difficult and slow the sealing of the tub. View the assembly process on ph: 519-923-9813 | info@dundalkleisurecraft.com| web: wwwdundalkleisurecraftcom Dundalk Leisurecraft Wood Burning Cedar Hot Tub Assembly Instructions
Index Cedar Hot Tub Site Preparation – Page 3 Cedar Hot Tub Assembly( Standard) – Page 4 to 9 Cedar Steps with Railing Assembly (Optional) – Page 10 & 11 Bench Installation (Standard) – Page 12 & 13 Wood Burning Heater Installation (Option) – Page 14 & 15 Insulated Hot Tub Cover (Option) – Page 16 Completion/Maintenance/Warranty – Page 17 & 18 ph: 519-923-9813 | info@dundalkleisurecraft.com| web: wwwdundalkleisurecraftcom Dundalk Leisurecraft Wood Burning Cedar Hot Tub Assembly Instructions Wood burning cedar hot tubs can weigh between 1500 to 8000lbs when full of water therefore a solid base for your hot tub is essential. Good drainage is also vital so any excess water can be carried away from the site. Your hot tub base can be constructed from the following. Concrete Pad A concrete pad forms an excellent base for your tub. A properly poured 4” reinforced pad will be stable and resistant to frost heave. Size the pad so that the sides are about as
long as the diameter of the tub Example: For a tub 6’ in diameter, pour a 6’ x 6’ pad. Wooden Deck Ensure that your deck has been designed to support the weight of a full tub. (1500 - 8000 lbs depending on the size of the tub). Have the deck inspected by a qualified architect or building engineer prior to proceeding. Cedar Hot Tub Site Preparation Cedar Hot Tub Site Preparation NOTE: During assembly, you will need about 3 feet of space all around the tub for the tightening process. If necessary, assemble the tub a few feet away from its final position, then lift it into position (with help). ph: 519-923-9813 | info@dundalkleisurecraft.com| web: wwwdundalkleisurecraftcom 3 Dundalk Leisurecraft Wood Burning Cedar Hot Tub Assembly Instructions Line up the 2 pieces so the edges are flush, insert a 2 1/2” Kreg screw into the edges on both sides of the floor seam. . Prepare the joists by laying them out as shown. Joists must run perpendicular (at right angle) to the
floor seam. Cedar Hot Tub Assembly To protect the wood during installation, lay the 2 floor pieces upside-down on something soft like a blanket. Using 3” screws, secure the joists to the floor as shown. Repeat for remaining joists. ph: 519-923-9813 | info@dundalkleisurecraft.com| web: wwwdundalkleisurecraftcom 4 Dundalk Leisurecraft Wood Burning Cedar Hot Tub Assembly Instructions Make sure the floor is level before continuing. Start placing the staves with the dado (groove) over the edge of the floor as shown. Use your rubber mallet to ensure that the staves are tight together at the seams, but do not make them tight against the edge of the floor. Cedar Hot Tub Assembly Once the joists are secure to the underside of the floor, flip the floor over and position it in it’s proper place on the foundation. Leave a space between the edge of the floor and the bottom of the dado. Use the pencil line circle on the floor as a guide. Continue inserting staves all around, each
time making sure the edges to be joined are clean and free of dirt or wood particles, that each new stave is tapped snug against the previous stave all along the joint. ph: 519-923-9813 | info@dundalkleisurecraft.com| web: wwwdundalkleisurecraftcom 5 Dundalk Leisurecraft Wood Burning Cedar Hot Tub Assembly Instructions You must avoid having the floor seam line up directly with any of the seams between the staves. You can install the floor drain at this time in the recessed hole in the floor. Cedar Hot Tub Assembly Insert the stave with the holes in it in line with where the heater will be. Slip the drain in place with the rubber gasket on the top side (inside the tub) and tighten the large nut underneath hand tight. Finish with a 1/2 turn with a pipe wrench. Do not overtighten! ph: 519-923-9813 | info@dundalkleisurecraft.com| web: wwwdundalkleisurecraftcom 6 Dundalk Leisurecraft Wood Burning Cedar Hot Tub Assembly Instructions When you insert final stave, it will be
somewhat tight. You might have to tap the surrounding few staves outward and apart slightly to make enough room to slide the final stave down into place. Locate the three stainless steel threaded rods and nuts for tightening the straps. Assemble one of the steel bands by sliding the rod with a nut on one end through the other and secure with a second nut. . Cedar Hot Tub Assembly Insert the rubber drain plug. Slip the assembled band over the tub. Rotate the band around the tub until the tightening hardware is where you want it to be when the tub is assembled. ph: 519-923-9813 | info@dundalkleisurecraft.com| web: wwwdundalkleisurecraftcom 7 Dundalk Leisurecraft Wood Burning Cedar Hot Tub Assembly Instructions Slide band to the bottom of the tub. It is important to position the strap directly over the center of the dado Tighten the nuts with a 3/4” wrench until the band is just snug enough so that it will stay in place. Assemble the other bands, and slip them into place
with their tightening hardware rotated so that it is offset from the one below as shown. Snug them up as before just enough so that they won’t slide out of position. Cedar Hot Tub Assembly Measure 2” from the bottom of the staves to the bottom of the band. Using the same method as the bottom band, measure 2” from the edge of the top staves to the top of band. ph: 519-923-9813 | info@dundalkleisurecraft.com| web: wwwdundalkleisurecraftcom 8 Dundalk Leisurecraft Wood Burning Cedar Hot Tub Assembly Instructions Tighten the staves in stages - bottom first, then uppers. Work your way around the tub, hitting each stave with a firm tap on the bottom band. You will see each stave sit a little tighter. . As you are tapping the staves, tighten up the slack in the bands. You will need to do the same to the top band, alternating several times between the two bands. Cedar Hot Tub Assembly Tighten each band a little at a time, starting with the bottom band. The middle band
should be centered evenly between the top and bottom bands. Repeat the process of hitting the staves and band with the rubber mallet and tightening the hardware in the same manner as the top and bottom bands. ph: 519-923-9813 | info@dundalkleisurecraft.com| web: wwwdundalkleisurecraftcom 9 Dundalk Leisurecraft Wood Burning Cedar Hot Tub Assembly Instructions If the optional steps are purchased, Start the construction of them now for easier access to the inside of the tub when building the benches. If no steps are purchased, continue to the bench assembly instructions. Stand the 2 sides up. ( You may need a helper to hold them for you) Lay the top step on the top of the stairs with the curved side facing the hot tub. Secure with 2 1/2” screws from the bottom using the pre drilled holes. . The bottom and third step will have one board that is shorter than the others. This is for the railing support. Be sure that when you install them, they are both on the same side of the
stairs. Secure remaining steps in same manner as above. Attach the railing supports on the 3rd and bottom steps where the step is recessed and secure with the provided nut and bolt through the pre drilled hole. Cedar Hot Tub Assembly (Steps) Longer support for the bottom step, shorter support for the 3rd step. ph: 519-923-9813 | info@dundalkleisurecraft.com| web: wwwdundalkleisurecraftcom 10 Dundalk Leisurecraft Wood Burning Cedar Hot Tub Assembly Instructions Center the bottom piece of the railing on to the railing supports and secure with 2” screws. Make sure the bottom edge of the top railing is flush on the ends to the bottom railing and secure up through the bottom railing using 2” screws. . Place the assembled steps next to the tub and secure in place with two 2” screws through brackets under the top step. Drive the screws through the bracket under the top step and into the tub, avoiding any seams. . ph: 519-923-9813 | info@dundalkleisurecraft.com| web:
wwwdundalkleisurecraftcom Cedar Hot Tub Assembly (Steps) 11 Dundalk Leisurecraft Wood Burning Cedar Hot Tub Assembly Instructions The Cedar Hot Tub has 3 benches. They each sit on two end brackets attached to the walls, and one support in the middle attached to the floor. To assemble benches, rest the benches on top of the tub to attach the bench-end supports. Attach bench brackets with supplied 2” screws . Make sure that the bench brackets are flush with the ends, and about ¾” back from the front edge of the benches. Secure the centre support to the bottom of the bench using the provided 2” screws . Assemble the remaining 2 benches in same manner. ph: 519-923-9813 | info@dundalkleisurecraft.com| web: wwwdundalkleisurecraftcom Cedar Hot Tub Assembly (Benches) 12 Dundalk Leisurecraft Wood Burning Cedar Hot Tub Assembly Instructions By trial and error, position the three assembled benches into the hot tub spacing them equally apart. Be absolutely sure that the
2” screws will not be screwed into any seams between the staves as this will cause a leak. Measuring 17 1/2” from the floor to the top of the bench on each end should make sure that the bench is level. Secure benches to hot tub wall with 2” screws, making sure that the 2” screws will not be screwed into any seams. . Fasten the bench supports to the tub floor using 2 1/2” screws. Avoid seams in the floor with the screws! Congratulations! Your Cedar Hot Tub is now assembled. Please refer to each of the remaining sections to install the various upgrades and options chosen. • Wood Burning Heater • Hot Tub Steps • Insulated Hot Tub Cover ph: 519-923-9813 | info@dundalkleisurecraft.com| web: wwwdundalkleisurecraftcom Cedar Hot Tub Assembly (Benches) 13 Dundalk Leisurecraft Wood Burning Cedar Hot Tub Assembly Instructions Failure to ensure that stove is completely filled with water before lighting the stove will result in damage to the stove beyond repair. Use only
firewood for burning in the stove Put a bead of silicone caulking under the flange of the heater hose fitting, and fasten it with three supplied mounting screws as shown. . Slide the heater hoses onto the outer side of the heater hose fittings and secure with gear clamps. Slide the heater into place and hook up the back of the heater to the heater hoses. Secure with gear clamps. Wood Burning Heater ( Optional) Tighten all gear clamps securely. ph: 519-923-9813 | info@dundalkleisurecraft.com| web: wwwdundalkleisurecraftcom 14 Dundalk Leisurecraft Wood Burning Cedar Hot Tub Assembly Instructions Slide the bottom stack pipe into the top of the heater. Slide the included heater guard over the first stack pipe. It will sit in place with no need to fasten. Slide top pipe into bottom pipe. Your heater stack is now complete. . Slide top pipe into bottom pipe. Your heater stack is now complete. . ph: 519-923-9813 | info@dundalkleisurecraft.com| web: wwwdundalkleisurecraftcom
Wood Burning Heater ( Optional) 15 Dundalk Leisurecraft Wood Burning Cedar Hot Tub Assembly Instructions Insulated Hot Tub cover The vinyl and foam cover is the main insulation for your tub. It should provide years of good service Avoid punctures or tears, which could allow water to get inside the cover. If you live in a high wind area, you will need to secure the cover so it doesn’t blow off. This can be done by using the attached hold-down straps or by other means. To use the hold-down straps, let each hang down along the outside of the tub. Use a pencil and mark the bottom of each buckle on the side of the tub. Next separate the buckle (two parts) and screw the bottom part to the side of the tub at your mark with small (1”) stainless steel screws (included). Included with the cover is a small plastic “key” that can be used to lock the strap buckles for security. Please note that this is not intended to prevent someone from getting in the tub. Insulated Hot Tub Cover
(Optional) To prevent children or others from getting in the tub you will need to install the tub in a secure area. ph: 519-923-9813 | info@dundalkleisurecraft.com| web: wwwdundalkleisurecraftcom 16 For assistance in the assembly of your Cedar Wood Burning Hot Tub please visit our support page at: https://www.dundalkleisurecraftcom/support/ Or to view the assembly process got to: https://www.youtubecom/watch?v=EZa-Y54VzmQ ph: 519-923-9813 | info@dundalkleisurecraft.com| web: wwwdundalkleisurecraftcom Completion/Maintenance/Warranty Congratulations on the assembly of your new Wood Burning Cedar Hot Tub 17 Dundalk Leisurecraft Wood Burning Cedar Hot Tub Assembly Instructions Tub Maintenance Your tub should last for many years and require little maintenance. Here are a few recommendations. Keep the tub filled whenever possible. Remember that a wooden tub is a dynamic object and the wood will swell and shrink with exposure to water or lack of it. Like a wooden boat, it will
seep water at first, then swell shut Leaving the tub unused for extended periods of time. If you need to leave the tub unused while on vacation or for other reasons, drain most of the water out leaving about 3 inches in the tub. Drain the heating system including any filters or pumps in the system Secure the cover on the tub and wrap the tub with a tarp to protect it and prevent excessive drying. The worst thing for a wooden tub is to let it dry out. Keep the tub filled whenever possible. This keeps the wood from drying out, shrinking and opening up the seams. If you need to drain the tub in cold weather or when you are away for an extended period, leave about 3 inches of water in the bottom so the floor seam will not dry out. The tub will not be permanently damaged by drying out, but will have to swell again to hold water. If the tub does dry out, you can check to see if the compression straps can be tightened up a bit. Tighten the bottom strap first, then the upper ones. Do not over
tighten the upper straps - they do not get tightened as much as the bottom one NEVER tighten the straps when the tub is full of water! Freezing: Never let the tub freeze solid when full of water!!! Since water expands when frozen, this will put enormous strain on the bottom, sides, hardware and heating system. If you are going to be away during freezing weather, or you want to shut your tub down during a cold snap, follow these steps: 1. Drain the tub down to about 3 inches in the bottom This amount of water will not cause freeze damage and will keep the floor seam tight. 2. Drain all parts of the heating system This includes heater, pipes, and anything you might have added such as pump, filter, etc. 3. If practical, disconnect and store the heater in a warm dry place WARRANTY Dundalk LeisureCraft Inc. warrants our cedar hot tubs against defects in materials and workmanship under normal/residential use for a period of five (5) years, as applicable, from the date of receipt of the
product by the original end-user consumer. This warranty does not apply to normal wear and tear and/or natural weather conditions This warranty does not cover regular required maintenance of the hot tub, refer to yourcedar hot tub assembly manual for maintenance guidelines. This warranty does not cover misuse or negligence and the manufacturer and associated retailers are not liable for any injury or damage caused by the product. This warranty is a parts only warranty and any service or labor costs would not be considered as part of the 5 year warranty. Completion/Maintenance/Warranty Purchaser Name: Date: Purchased From: ph: 519-923-9813 | info@dundalkleisurecraft.com| web: wwwdundalkleisurecraftcom 18
 Augusto Pinochet Ugarte néven, 1915. november 25-én született a chilei Valparaísoban. [1]A valparaísói San Rafael Papneveldében, a Quillota Iskolában, illetve a Ferences Atyák Valparaísói Iskolájában is folytatott tanulmányokat. 1933-ban iratkozott be egy katonai iskolába, amelynek elvégzése után hadnagyi ranggal került a gyalogsághoz. [1]A következő években a folyamatos